The Best Fluffy Pancakes recipe you will fall in love with. Full of tips and tricks to help you make the best pancakes.
Vegan Burger Buns Recipe
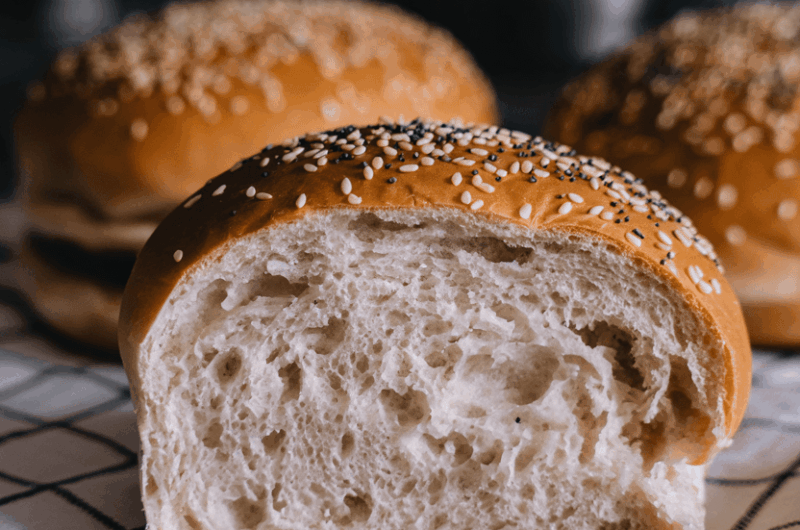
You know those burger buns that are so fluffy, they practically squeak when you squish them? That’s what we’re going for here. Except—get this—they’re 100% vegan and don’t taste like cardboard.
These buns are soft, pillow, just the right amount of sweet, and strong enough to handle the juiciest, messiest vegan burger you can stack.
I’ve made these for cookouts, weeknight dinners, and even just because I wanted a fancy sandwich. Every time? Gone in minutes.
So if you’ve been settling for dry, store-bought buns with a weird aftertaste, it’s time to level up. These homemade buns are about to be your new obsession.
Recipe Snapshot
| Category | Details |
| Yield | 8 burger buns |
| Serving Size | 1 bun |
| Prep Time | 25 minutes |
| Cook Time | 20 minutes |
| Total Time | 2 hours 15 minutes |
| Calories per Serving | ~210 calories |
| Primary Cooking Method | Baking |
| Proofing Time | 90 minutes |
| Occasion | Cookout, Weeknight Dinner |
| Diet Type | Vegan |
Calories are approximate and may vary depending on exact ingredients used.
Vegan Burger Buns Recipe
Course: DessertCuisine: FrenchDifficulty: EasyServings
1
bunPrep time
25
minutesCooking time
20
minutesCalories
210
kcalThese vegan burger buns are soft, fluffy, and the perfect size to cradle your favorite plant-based patties. Made with pantry staples, they’re simple to pull off but taste bakery-level amazing. You’ll never want to go back to store-bought.
Ingredients
- For the Dough
3 ½ cups (440g) all-purpose flour
2 tablespoons organic cane sugar
1 ½ teaspoons salt
1 tablespoon instant yeast (or active dry yeast)
1 cup (240ml) warm oat milk (or other plant milk, around 110°F)
3 tablespoons vegan butter, melted (plus more for brushing)
- For the Topping
2 tablespoons plant milk (for brushing)
1 tablespoon maple syrup (optional, for golden tops)
Sesame seeds (optional, for garnish)
Directions
- Preparing the Yeast Mixture (if using active dry)
Warm the oat milk until it’s around 110°F—comfortably warm to the touch but not hot. Stir in the cane sugar, then sprinkle the active dry yeast over the surface. Let it sit for 5–10 minutes until foamy. If using instant yeast, you can skip this step and mix it directly with the dry ingredients. - Mixing the Dough
In a large mixing bowl, combine the all-purpose flour, salt, and instant yeast (if that’s your choice). Pour in the foamy yeast mixture (or the warm milk if using instant yeast) and the melted vegan butter. Stir until the dough begins to come together into a shaggy mass. If using a stand mixer, use a dough hook on low speed. - Kneading the Dough
Transfer the shaggy dough to a clean, lightly floured surface. Knead it for about 8–10 minutes by hand. You’ll feel it transform into a smooth, elastic dough. Alternatively, continue mixing with the dough hook on medium speed for the same amount of time. The dough should be tacky but not sticky, and bounce back slightly when poked. - First Rise (Bulk Fermentation)
Lightly grease a large bowl with oil or cooking spray. Place your dough ball in the bowl and turn it to coat. Cover the bowl with a clean kitchen towel or plastic wrap. Let the dough rise in a warm, draft-free area for about 60–90 minutes, until it has doubled in size. It should leave a slight indent when gently poked. - Dividing and Shaping the Dough
After the first rise, gently punch down the dough to release excess gas. Turn it out onto a lightly floured surface. Divide it into 8 equal pieces using a sharp knife or bench scraper. If you want uniform buns, weigh the pieces with a kitchen scale.
To shape, tuck the edges of each dough piece under itself to form a tight ball. Roll gently between your palms or against the counter to smooth the surface. Place each bun on a parchment-lined baking sheet, spacing them about 2 inches apart. - Second Rise (Proofing)
Cover the buns loosely with a clean towel or lightly greased plastic wrap. Let them rise again for 30–45 minutes, or until puffy and visibly larger. They should jiggle slightly if you nudge the baking sheet. - Preparing for Baking
Preheat your oven to 375°F (190°C). In a small bowl, mix the 2 tablespoons of plant milk with maple syrup (if using). This gives the buns a nice golden sheen. Gently brush the tops of the buns with this mixture. Add sesame seeds if desired. - Baking the Buns
Bake the buns in the preheated oven for 18–20 minutes, or until the tops are golden brown. When you tap the top of a bun, it should sound slightly hollow. This is your cue that they’re baked through. - Cooling and Finishing
Remove the baking sheet from the oven and immediately transfer the buns to a wire cooling rack. Let them cool for at least 15–20 minutes before slicing. This resting period helps the buns set and keeps the interior soft and steamy.
Extra Tips
- Use Bread Flour for Extra Chew
Want buns with a bit more bite and chewiness? Swap out half of the all-purpose flour for bread flour. It’s got a higher protein content, which gives structure and a slight chew that works beautifully for burger buns. - Get Creative with Toppings
While sesame is classic, don’t stop there. Try poppy seeds, everything bagel seasoning, or even a sprinkle of coarse salt and dried herbs for a savory twist. Just make sure to apply your wash so everything sticks. - Don’t Skip the Cooling
I know it’s tempting to slice into warm bread fresh out of the oven—but letting the buns cool for 15–20 minutes helps them finish baking inside and sets that fluffy texture. Slicing too soon can make them gummy. - Uniform Shape = Even Bake
Use a kitchen scale to divide the dough evenly. Uniform buns not only look better but also bake more evenly. No one wants one bun undercooked while the other is already browning. - Don’t Kill the Yeast
This one’s important: make sure your oat milk isn’t too hot. If it’s over 115°F, it might kill the yeast before it even gets to work. Use a thermometer or the good ol’ “feels warm but not hot” test. - Check Your Oven Temp
Oven temps can be sneaky. Use an oven thermometer to make sure yours is running true. Too hot and your buns brown too fast on the outside while staying doughy inside. Too cool and they’ll take forever to rise and color.
Equipment List
- Large mixing bowl
- Dough hook or wooden spoon
- Stand mixer (optional but helpful)
- Measuring cups and spoons
- Kitchen thermometer (optional, for milk temperature)
- Sharp knife or bench scraper
- Parchment paper
- Baking sheet
- Kitchen scale (optional, for even buns)
- Pastry brush
- Wire cooling rack
Substitutions & Variations
Whole Wheat Buns
Want to feel a little healthier while still carb-loading? You can substitute up to 50% of the all-purpose flour with whole wheat flour. But don’t go full whole wheat here—it’ll make the buns way too dense and gummy. Also, be prepared to slightly increase the dough’s hydration since whole wheat flour is thirstier than all-purpose.
Sesame Seed Finish
Looking for that classic burger bun aesthetic? Toss some sesame seeds on top. To make them stick better, skip the usual butter or milk brush. Instead, whisk together 1½ teaspoons cornstarch with 3 tablespoons of water. Boil ¼ cup of water on the stove, then mix in the slurry. Simmer for 30 seconds while whisking until thick and clear. Let it cool, brush it on your shaped buns, and sprinkle away.
Smaller Buns
This recipe yields 8 pretty substantial buns—perfect for big, juicy burgers. If you’re going slider-style or just prefer a lighter bun, divide your dough into more pieces. Just be sure to adjust the baking time slightly (usually a few minutes less) since smaller buns will bake faster.
Make-Ahead Tips
Prepare the Dough Ahead of Time
Short on time the day-of? You can make the dough the night before. After kneading, cover the bowl tightly and place it in the refrigerator. Let it rise slowly overnight—this even enhances the flavor. The next day, allow the dough to sit at room temperature for 30–45 minutes before shaping.
Shaped Buns, Ready to Bake
Alternatively, shape the buns, cover them, and refrigerate them right before the second rise. The next day, take them out and let them warm up and rise fully (this may take up to an hour) before baking.
Freeze for Later
Fully baked and cooled buns freeze beautifully. Wrap them tightly in plastic wrap and pop into a freezer-safe bag. They’ll stay fresh for up to 3 months. When you’re ready to eat, thaw at room temp or warm in the oven for a few minutes to refresh.
Storage Instructions
Room Temperature
Once the buns are completely cooled, store them in an airtight container or resealable plastic bag. They’ll stay soft and fresh for about 2 to 3 days at room temperature. For best texture, avoid refrigerating them as it tends to dry them out faster.
Freezing
Want to keep them longer? These buns freeze like champs. Wrap each cooled bun individually in plastic wrap and place them in a zip-top freezer bag. Freeze for up to 3 months. To reheat, simply thaw at room temperature or warm them in a 300°F (150°C) oven for 5–10 minutes.
Reviving Day-Old Buns
If your buns start feeling a little stale, pop them into the microwave for about 10 seconds with a damp paper towel. Or toast them lightly before using—trust me, they’ll taste bakery-fresh again in no time.
Check Your Oven Temp
Oven temps can be sneaky. Use an oven thermometer to make sure yours is running true. Too hot and your buns brown too fast on the outside while staying doughy inside. Too cool and they’ll take forever to rise and color.
FAQ
Can I make these buns gluten-free?
Not with a simple 1:1 flour swap—gluten-free flours behave totally differently. However, there are specific gluten-free bread recipes out there that use xanthan gum or psyllium husk to mimic the texture. If you’re strictly gluten-free, I’d recommend starting with a recipe designed for it.
What’s the best plant milk for this recipe?
Oat milk is our go-to because it’s rich and slightly sweet. But soy, almond, or cashew milk also work great. Just make sure whatever you use is unsweetened and unflavored so it doesn’t mess with the taste of the buns.
Why didn’t my dough rise?
Most likely culprits? Your yeast was old, your plant milk was too hot and killed the yeast, or the environment was too cold. Always check the expiration date, use a thermometer if possible, and let the dough rise somewhere warm and draft-free.
Can I skip the second rise?
Tempting, but don’t. The second rise helps give the buns their final shape and a soft, light texture. Skipping it will give you flatter, denser buns—not what we’re going for here.
Can I use a bread machine?
Yes! You can use the dough setting to mix and knead. Once it’s finished, just take the dough out, divide, shape, proof again, and bake as usual.
How do I know when they’re done baking?
Besides being golden on top, they should sound slightly hollow when tapped. You can also check the internal temperature—it should be around 190–200°F for fully baked buns.
Nutritional Information
Here’s a rough estimate per bun (based on 8 buns per batch):
- Calories: ~210 kcal
- Total Fat: 5g
- Saturated Fat: 1g
- Carbohydrates: 36g
- Sugar: 3g
- Fiber: 2g
- Protein: 5g
- Cholesterol: 0mg
- Sodium: 290 mg
These values are approximations and can vary depending on specific ingredients used.

Final Thoughts
There’s just something magical about biting into a soft, homemade burger bun that you made from scratch. These vegan buns are a total game-changer—whether you’re stacking up a big ol’ black bean patty, tofu steak, or just slathering one in hummus and calling it dinner. They’re easy enough for a weeknight but impressive enough for your next backyard BBQ.
Once you make these, there’s really no going back to store-bought. They’re fluffy, golden, and just the right balance of chewy and soft. So roll up your sleeves, preheat that oven, and get ready to impress yourself. You’ve got this.