The Best Fluffy Pancakes recipe you will fall in love with. Full of tips and tricks to help you make the best pancakes.
Brown Butter Rice Crispy Treats Recipe
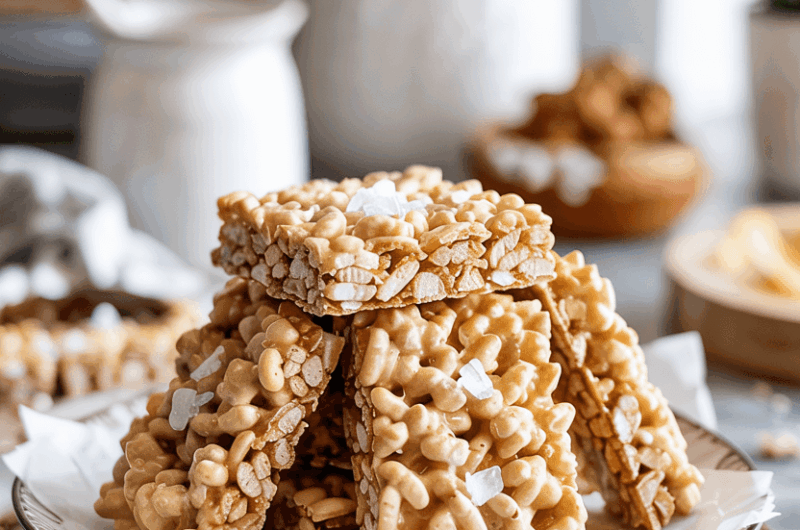
There’s something about Brown Butter Rice Crispy Treats that instantly brings back a wave of cozy nostalgia—yet with a rich, gourmet twist. We all know and love the classic rice crispy treats from childhood, but this version elevates the beloved dessert with one simple, magical step: browning the butter.
When you brown butter, you unlock layers of warm, nutty, caramel-like flavor that transform the basic marshmallow-and-cereal combination into something truly special. Every chewy bite is filled with toasty goodness, gooey marshmallow pockets, and that deep buttery aroma that feels like a hug.
Perfect for bake sales, school lunches, potlucks, family movie nights, or just a treat-yourself moment, these bars come together quickly and easily with only a few pantry ingredients. Plus, no oven is required!
Whether you’re a beginner in the kitchen or a seasoned home baker, this recipe is simple to master and guaranteed to wow anyone who takes a bite. Let’s dive into how to make Brown Butter Rice Crispy Treats that feel fancy but are secretly super easy.
Recipe Snapshot
Before diving into the details, here is a quick overview of the important recipe facts you need to know.
| Category | Details |
| Yield | 16 squares |
| Serving Size | 1 square |
| Prep Time | 15 minutes |
| Cook Time | 10 minutes |
| Total Time | 25 minutes |
| Calories per Serving | ~180 |
| Primary Cooking Method | Stovetop |
| Cooling Time | 30 minutes |
| Occasion | Snacks, Bake Sales |
| Diet Type | Vegetarian |
Calories are approximate and may vary depending on exact ingredients used.
Brown Butter Rice Crispy Treats Recipe
Course: DessertsCuisine: AmericanDifficulty: EasyServings
16
servingsPrep time
15
minutesCooking time
10
minutesCalories
180
kcalBrown Butter Rice Crispy Treats are gooey, chewy, and just a little sophisticated thanks to the addition of browned butter. With minimal ingredients and no baking required, they offer a rich twist on the classic treat. The result is a buttery bar with a deep, toffee-like flavor and pockets of melty marshmallow.
Ingredients
1/2 cup (1 stick / 113g) unsalted butter
10 oz (1 bag) mini marshmallows, divided (9 cups total; reserve 1 cup for later)
6 cups crisped rice cereal (such as Rice Krispies)
1/4 teaspoon fine sea salt (optional, but enhances flavor)
1 teaspoon vanilla extract (optional)
Flaky sea salt for garnish (optional)
Directions
- Prepare Your Pan
Start by lining a 9×9-inch pan with parchment paper or foil, leaving some overhang on the sides to lift out the treats later. Lightly grease the parchment with butter or nonstick spray to prevent sticking. - Brown the Butter
Place your butter in a large heavy-bottomed saucepan or Dutch oven. Melt over medium-low heat. Once melted, the butter will begin to foam and sputter. Stir constantly with a spatula to avoid burning.
Watch carefully: After about 5–7 minutes, the butter will change color to a deep golden brown and emit a warm, nutty smell. As soon as you see brown bits forming at the bottom and smell that deep aroma, immediately reduce the heat to low. - Melt the Marshmallows
With the heat on low, quickly add 9 cups of the mini marshmallows. Stir continuously with the spatula until fully melted and smooth. If needed, briefly turn up the heat, but avoid high heat, which can scorch the marshmallow mixture.
Stir in vanilla extract and fine sea salt at this stage for extra depth of flavor. - Add the Cereal
Remove the pan from heat. Immediately add the crisped rice cereal and fold it into the marshmallow mixture with a spatula until well coated.
Just before it sets, fold in the reserved 1 cup of mini marshmallows for extra pockets of gooeyness. - Press into the Prepared Pan
Transfer the sticky mixture to your prepared pan. Lightly butter your hands or spatula and gently press the mixture into an even layer. Press lightly—don’t pack it down tightly, or the bars will be too hard.
Sprinkle with flaky sea salt if you want a sweet-salty contrast. - Cool and Cut
Allow the bars to cool completely at room temperature for about 30 minutes. Lift the set slab out using the parchment paper and place on a cutting board. Use a sharp knife to cut into 16 neat squares.
– For cleaner cuts, wipe the knife with a damp cloth between each slice.
Make-Ahead Tips
- Prep Ingredients First: Measure out cereal and marshmallows before starting.
- Make Ahead: Prepare treats up to 2 days ahead and store tightly covered at room temperature.
- Freeze for Later: Wrap individual bars in plastic and freeze in an airtight bag for up to 2 months.
Equipment Needed
A few basic kitchen tools are all you need to create these wonderful treats.
- Large saucepan or Dutch oven
- Silicone or heat-resistant spatula
- 9×9-inch baking pan
- Parchment paper or foil
- Butter or cooking spray
- Measuring cups and spoons
Storage Instructions
Proper storage will help maintain their soft and chewy texture.
- Store at room temperature in an airtight container for up to 3 days.
- Avoid refrigeration as it dries them out and makes them tough.
- To keep them fresher longer, place a slice of white bread in the container (but not touching the treats).
Extra Tips for Best Results
Here are some special secrets to getting perfect treats every time.
- Use Fresh Marshmallows: Older marshmallows become dry and don’t melt well.
- Act Quickly: The mixture hardens fast as it cools, so mix and press into the pan without delay.
- Don’t Overpack: Lightly press the cereal mixture to keep the bars chewy.
- Flavor Boosters: Mix in peanut butter, Nutella, or cinnamon for new flavors.
- Double the Batch: Use a 9×13-inch pan and double the ingredients for parties.

Ingredient Selection Advice
Picking high-quality ingredients will make your rice crispy treats truly next level.
- Butter: Use European-style butter (like Kerrygold) for deeper flavor.
- Marshmallows: Stick to fresh, mini-sized marshmallows for best melting.
- Rice Cereal: Choose a good-quality brand that stays crisp and doesn’t become soggy.
Fun Variations to Try
Add your own twist to this base recipe with these easy changes.
- Chocolate Drizzle: Drizzle melted chocolate over the top after they cool.
- Nutty Treats: Add 1/2 cup chopped roasted almonds, pecans, or peanuts.
- Fruity Twist: Fold in 1/2 cup of dried cranberries or freeze-dried strawberries.
- Candy Mix-Ins: Stir in M&Ms or crushed cookies for a festive feel.
Serving Suggestions
Make these treats extra special for different occasions.
- Cut into fun shapes with greased cookie cutters.
- Serve wrapped in parchment paper for parties.
- Top with sprinkles for colorful celebrations.
- Package individually for bake sales or gifting.
Frequently Asked Questions
Let’s quickly answer some common questions about Brown Butter Rice Crispy Treats.
Q: Why brown the butter?
A: Browning creates a nutty, deep flavor that makes these treats extra special.
Q: Can I use regular large marshmallows?
A: Yes, chop them into smaller pieces before melting.
Q: Can I make these vegan?
A: Yes! Use vegan butter and vegan marshmallows (like Dandies).
Q: My treats turned out hard. What went wrong?
A: You might have cooked the marshmallow mixture too long or packed the cereal too tightly.
Q: How do I get neat squares?
A: Grease the knife and wipe clean between cuts.
Final Thoughts
Brown Butter Rice Crispy Treats are the perfect example of how a simple upgrade can transform a familiar favorite into something luxurious. Their rich, nutty flavor, chewy texture, and quick preparation make them ideal for any occasion. Make a batch today—your future self will thank you!