The Best Fluffy Pancakes recipe you will fall in love with. Full of tips and tricks to help you make the best pancakes.
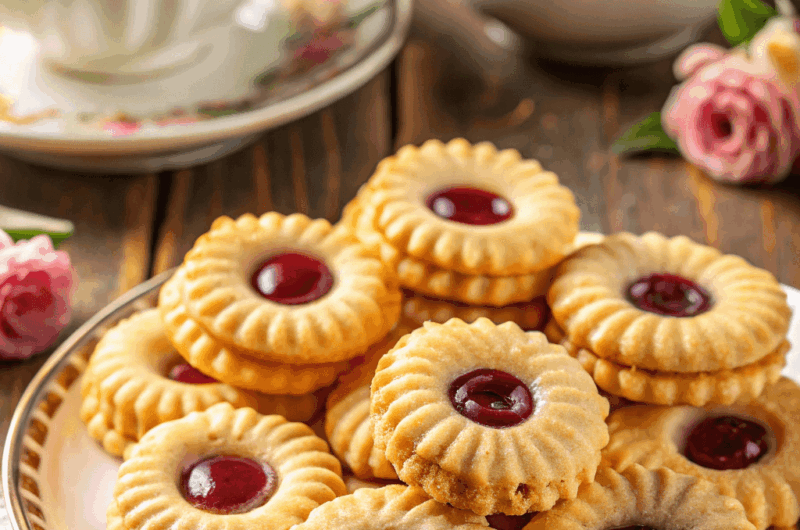
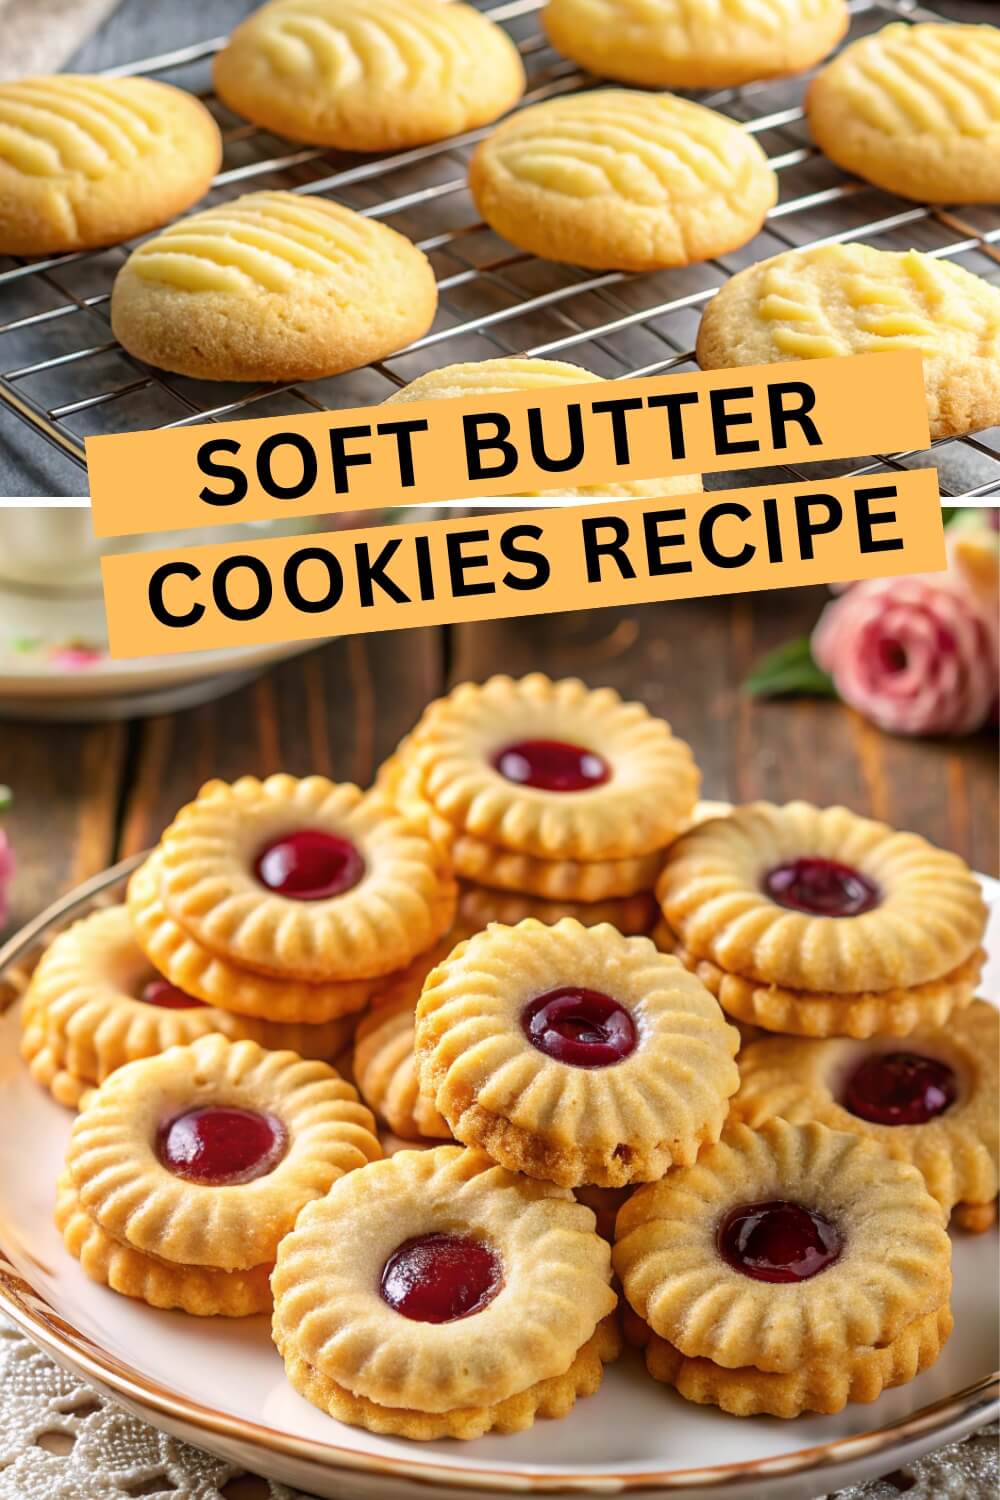
Butter Cookies | Simple Buttery Delight
There’s just something magical about biting into a butter cookie that crumbles delicately before it melts right on your tongue. They’re the perfect afternoon tea companion, the cookie jar hero, and the ultimate “I’ll just have one more” kind of treat. The best part?
You don’t need a mile-long ingredient list or a fancy pastry degree to whip these up. Just a handful of simple ingredients, a piping bag, and some patience while your house fills with that buttery, sweet aroma.
In this guide, I’m going to walk you through my go-to recipe for butter cookies. It’s ridiculously easy, incredibly addictive, and trust me you’ll be sneaking them off the tray before they’ve even cooled.
Recipe Snapshot:
| Category | Details |
| Yield | About 40 cookies |
| Serving Size | 2–3 cookies per person |
| Prep Time | 20 minutes |
| Bake Time | 15 minutes |
| Cooling Time | 30 minutes |
| Total Time | 1 hour 5 minutes |
| Calories per Serving | ~95 calories |
| Primary Cooking Method | Baking |
Calories are approximate and may vary depending on exact ingredients used. And the resting time of the dough is not considered in the total recipe.
Butter Cookies
Course: DessertCuisine: FrenchDifficulty: EasyServings
2
cookiesPrep time
20
minutesBake Time
15
minutesCalories
95
kcalIf you’ve ever dreamed of a cookie that’s crisp on the outside but tender and melt-in-your-mouth soft in the center, these butter cookies are it. Made with simple pantry staples and a touch of milk powder for extra richness, this recipe delivers bakery-style cookies without the fuss.
Ingredients
- For the Cookie Dough
260 g (2 1/8 cups) all-purpose flour
1/2 teaspoon salt
226 g (1 cup) unsalted butter, softened (not melted)
100 g (1/2 cup) granulated sugar
2 large egg yolks, room temperature
2 teaspoons vanilla extract or essence
33 g (1/4 cup) milk powder
Optional: 1–2 teaspoons milk, if dough needs softening
- For Decoration (Optional)
100 g (3.5 oz) melted chocolate (semi-sweet, milk, or white)
Sprinkles, for garnish
Directions
- Prep the Oven and Trays
Preheat your oven to 180°C (350°F), conventional setting. Line two large baking sheets (about 18 x 13 inches each) with parchment paper and set aside. This ensures no sticking and easy cleanup. - Mix the Dry Ingredients
In a medium bowl, whisk together the flour and salt. No need to sift—just make sure the salt is evenly distributed. Set aside. - Cream the Butter and Sugar
In a large mixing bowl, add softened butter and sugar. Using a hand or stand mixer on medium speed, cream for about 3 minutes until light and fluffy. Don’t overmix—you want airiness, not whipped cream. - Add Yolks, Vanilla, and Milk Powder
Beat in the egg yolks, vanilla, and milk powder on low speed until just combined. This adds richness and that melt-in-your-mouth magic. - Bring It All Together
Add the flour mixture to the wet ingredients. Mix on low until just combined—avoid overmixing to keep your cookies tender. Use a spatula to push the dough down and smooth out air bubbles. The dough should be firm but pliable, not sticky.
Tip: If the dough feels too stiff to pipe, gently fold in 1 teaspoon of room temperature milk. Only add more if absolutely necessary, as extra liquid means more spreading. - Pipe the Cookies
Transfer half the dough into a piping bag fitted with a large star tip (like 849, 827, or 1M). Pipe rosettes or swirls onto the prepared trays, leaving space between each cookie. Doubling up the piping bag can help prevent tears if your dough is firm. - Chill Before Baking
Place the trays in the refrigerator for 30 minutes. This step is non-negotiable—it helps the cookies keep their shape and prevents excessive spreading. - Bake to Perfection
Bake one tray at a time on the middle rack for 15 minutes, or until the edges are lightly golden. For a crispier, more flavorful bite, allow a bit more browning, but watch closely to avoid overbaking. - Cool and Decorate
Let cookies cool completely on the tray before moving. Once cooled, dip in melted chocolate and top with sprinkles if you’re feeling fancy. Or keep them plain for a classic touch.
Extra Tips
- Always start with butter that’s softened but not melted. Too soft, and your cookies will spread too much.
- Chill the piped dough before baking—it’s the secret to cookies that hold their pretty shapes.
- Pipe smaller cookies if you like them extra crisp, or larger ones for a softer center.
- If your piping bag feels too stiff to handle, let the dough rest at room temperature for 5 minutes.
- For an extra flavor boost, try adding a pinch of cinnamon, cardamom, or citrus zest to the dough.
- Don’t skip lining your trays—parchment paper ensures even baking and easy cleanup.
Equipment List
- Large mixing bowl
- Hand or stand mixer
- Medium bowl (for dry ingredients)
- Spatula
- Piping bag + large star tip (849, 827, or 1M)
- Two large baking sheets (18 x 13 inches)
- Parchment paper
- Cooling rack
Substitution Options
- Flour: You can swap all-purpose flour with a gluten-free flour blend for a gluten-free version. Just be sure it includes xanthan gum to mimic the structure.
- Butter: If you’re dairy-free, replace butter with vegan butter or margarine. Coconut oil can work too, but it will slightly change the flavor and texture.
- Sugar: Use powdered sugar instead of granulated for a finer crumb, or swap with coconut sugar for a less refined option. For diabetics, erythritol or monk fruit sweetener can work.
- Egg Yolks: Replace with 2 tablespoons of unsweetened applesauce or plain yogurt for a vegetarian or egg-free option.
- Milk Powder: You can skip this ingredient or substitute with almond flour or coconut milk powder for a different twist.
Make-Ahead Tips
- Dough Storage: You can make the dough up to 3 days in advance. Store it tightly wrapped in plastic wrap in the fridge. When ready, let it soften slightly before piping.
- Frozen Dough: Pipe the cookies onto a baking sheet, freeze until solid, then transfer them to an airtight container or freezer bag. They can be baked straight from frozen—just add 2–3 extra minutes to the bake time.
- Baked Cookies: Fully baked cookies can be made a day or two in advance. In fact, their texture improves slightly after resting overnight.
Storage Instructions
- Room Temperature: Store cooled cookies in an airtight container at room temperature for up to 1 week. Layer them with parchment paper to prevent sticking.
- Refrigeration: While not necessary, you can keep cookies in the fridge for up to 2 weeks. Let them sit out for a few minutes before eating so the texture softens.
- Freezing Baked Cookies: Freeze fully cooled cookies in a single layer, then transfer to a freezer bag or container. They’ll keep well for up to 3 months. Thaw at room temperature before serving.
- Chocolate-Dipped Cookies: If you’ve dipped them in chocolate, store in a cool, dry place or the fridge to keep the coating from melting.
FAQ Section
Why did my cookies spread too much?
This usually happens if the butter was too soft or if the dough wasn’t chilled before baking. Always refrigerate piped cookies for at least 30 minutes.
Can I use salted butter instead of unsalted?
Yes, but reduce or skip the added salt in the recipe to balance flavors.
Do I have to pipe the cookies?
Nope! You can roll the dough into balls and flatten them slightly with a fork for a more rustic look.
Can I double the recipe?
Absolutely. Just make sure to mix in batches so the dough stays evenly combined.
Why do the cookies taste better the next day?
Resting allows the flavors to meld and the texture to settle, making them softer in the center while still crisp on the outside.
Can I freeze baked cookies?
Yes! Freeze in layers with parchment between them and thaw at room temperature when ready to enjoy.
Food Safety
- Egg Yolks: Since this recipe uses raw egg yolks in the dough before baking, always use fresh, high-quality eggs. Avoid recipes if the yolks have been sitting out too long.
- Butter Handling: Keep butter refrigerated until just before softening. Do not let it sit out for hours, as this increases the risk of bacterial growth.
- Storage Containers: Always store baked cookies in clean, airtight containers to prevent contamination.
- Freezer Safety: When freezing dough or cookies, label and date your containers. Consume within 3 months for best quality and safety.
- Cross-Contamination: Use separate utensils and mixing bowls if preparing gluten-free or allergy-friendly versions to avoid cross-contact.
Final Thoughts
Butter cookies are the kind of timeless treat that never fails to impress. Whether you enjoy them plain, dipped in chocolate, or dressed up with sprinkles, their rich, buttery flavor and delicate crumb make them an instant crowd-pleaser.
They’re simple to prepare, fun to pipe, and even more fun to eat. Bake a batch, share a few (or not), and let these little gems brighten up your snack time.