The Best Fluffy Pancakes recipe you will fall in love with. Full of tips and tricks to help you make the best pancakes.
Red Velvet Cupcakes That’ll Steal the Spotlight
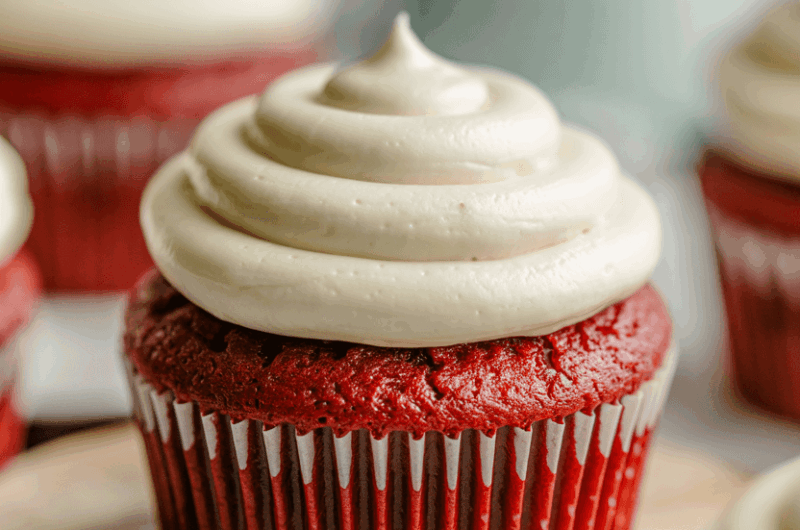
Let’s clear something up real quick—red velvet cupcakes are not just chocolate cupcakes with a pretty paint job. Nope. They’re delicate little masterpieces that blend subtle cocoa notes, a touch of tang, and a soft, velvety texture that melts in your mouth. It’s like chocolate and vanilla got together and had a dramatic, ruby-colored baby.
I made a batch of these over the weekend, and let me tell you—I was not prepared. The flavor? Off the charts. The texture? Fluffy perfection. The frosting? So good I may have eaten it by the spoonful before it ever touched a cupcake (no regrets). And don’t even get me started on how gorgeous they looked.
Every bite had that perfect balance of buttery richness, a whisper of cocoa, and that signature tang from the buttermilk and vinegar combo. And once that cream cheese frosting hit? Game over. These cupcakes are the kind of dessert that make you pause mid-bite and go, “Wait, did I just bake this?”
Honestly? Anytime. They’re fancy enough for birthdays and holidays but chill enough for a random Tuesday night bake session. Plus, they’re a guaranteed crowd-pleaser. People lose their minds over the bold color and classic flavor.
So whether you’re baking to impress, stress-baking to decompress, or just have a craving you can’t shake—these red velvet cupcakes are your new best friend. Moist, vibrant, and topped with a rich cream cheese frosting that could totally stand on its own, this recipe is an absolute keeper.
Recipe Snapshot
| Category | Details |
| Yield | 12 cupcakes |
| Serving Size | 1 cupcake |
| Prep Time | 20 minutes |
| Bake Time | 20–22 minutes |
| Total Time | 45 minutes |
| Calories per Serving | ~370 calories |
| Primary Cooking Method | Baking |
| Occasion | Birthdays, Holidays, Anytime |
| Diet Type | Vegetarian |
Calories are approximate and may vary depending on exact ingredients used.
Red Velvet Cupcakes
Course: DessertCuisine: AmericanDifficulty: EasyServings
1
cupcakePrep time
20
minutesBake Time
20
minutesCalories
370
kcalRed velvet cupcakes aren’t just eye candy—they’re a flavor bomb. These little red beauties have this delicious mystery about them: not quite chocolate, not quite vanilla, but something uniquely rich and tangy that gets better with every bite. It’s the combination of buttermilk, vinegar, and cocoa that creates that signature flavor and incredibly soft texture. The acidity gives it lift and balance, the cocoa brings depth, and the red coloring makes it pop. And yes, that ever-so-slight tang? Totally intentional and completely essential to the experience.
Ingredients
- For the Cupcakes
125g unsalted butter (softened)
200g caster sugar
2 large eggs (room temperature)
1 tsp vanilla extract
2 tbsp cocoa powder
1 tbsp red food coloring (gel for best color)
250ml buttermilk
240g plain flour
1 tsp bicarbonate of soda
1 tsp white vinegar
1/4 tsp salt
- For the Cream Cheese Frosting
100g unsalted butter (softened)
200g full-fat cream cheese (cold)
400g icing sugar (sifted)
1 tsp vanilla extract
Directions
- Prepare the Batter
- Cream the Butter and Sugar
Start by beating the softened butter and caster sugar in a large bowl. Use an electric mixer and go for 3–4 minutes until the mixture is pale, fluffy, and airy—this step gives the cupcakes their soft texture. - Incorporate Eggs and Vanilla
Crack in the eggs one at a time. Beat well after each addition to keep the batter from separating. Add the vanilla extract and mix until just combined. - Create the Red Cocoa Paste
In a separate small bowl, combine the cocoa powder, red food coloring, and about a tablespoon of the buttermilk. Mix until smooth and vibrant. This creates that signature red velvet flavor and color punch. Stir this paste into the batter thoroughly. - Combine Dry and Wet Ingredients
- Sift the Dry Ingredients
In another bowl, sift together the plain flour and salt. This prevents lumps and ensures a light batter. - Alternate with Buttermilk
Add the flour mixture to the wet batter in three parts, alternating with the buttermilk. Begin and end with the flour. Mix each addition until just combined—overmixing will make your cupcakes dense. - Make It Fluffy
- Add the Baking Soda-Vinegar Mixture
In a tiny bowl, mix the bicarbonate of soda and vinegar. It will fizz immediately—pour it straight into the batter and fold it in gently but quickly. This reaction is what gives the cupcakes their rise and fluffy crumb. - Bake the Cupcakes
- Preheat and Line the Tin
Preheat your oven to 170°C fan (or 180°C conventional). Line a 12-cup muffin tray with paper cupcake liners. - Portion and Bake
Divide the batter evenly among the liners, filling each about two-thirds full. Bake in the center of the oven for 20–22 minutes, or until a skewer poked into the center comes out clean. - Cool Properly
Remove from the oven and let the cupcakes sit in the tray for 10 minutes. Then transfer them to a wire rack to cool completely. This prevents sogginess from trapped steam. - Frost Like a Pro
- Beat the Butter
In a medium bowl, beat the softened butter until creamy and light—about 2 minutes. - Add the Cream Cheese
Add the cold cream cheese straight from the fridge and beat just until combined. You want it smooth but not runny. - Mix in Sugar and Vanilla
Gradually add the sifted icing sugar in batches, beating slowly at first to avoid a sugar explosion. Add vanilla extract and beat until light and fluffy. Don’t overmix or the frosting may become too soft to pipe. - Pipe or Spread
Once the cupcakes are fully cool, load the frosting into a piping bag with a round or star nozzle and swirl it on. Or go old-school and spread it with a knife. Both work and both taste amazing.
Extra Tips
- Use gel food coloring for a vibrant red without altering the texture
- Always bring your eggs and butter to room temperature for smoother mixing.
- If your frosting feels too soft, chill it for 10–15 minutes before piping.
- Add a tiny pinch of salt to the frosting to balance sweetness.
- Want that bakery look? Use a large star tip and pipe high swirls.
Equipment List
- Mixing bowls (at least 3)
- Electric mixer or stand mixer
- Cupcake tin
- Cupcake liners
- Measuring cups/spoons or kitchen scale
- Sifter for icing sugar
- Piping bag & nozzle (optional but makes it fancy)
- Cooling rack
Substitution Options
Need to tweak the recipe? No problem! Whether you’re baking for someone with dietary restrictions or just missing a pantry staple, red velvet cupcakes are surprisingly flexible. No buttermilk? A quick DIY version with milk and vinegar works perfectly. Gluten-free baker? A 1:1 flour swap gets you there—just make sure it includes xanthan gum to hold things together. Going dairy-free? Use your favorite plant-based butter and cream cheese alternative (almond-based ones tend to work best flavor-wise). For eggs, unsweetened applesauce or a flax egg does the trick. And if you’re steering clear of artificial food coloring, natural options like beetroot powder can still give your cupcakes that signature red flair—just a bit earthier in tone. With a few thoughtful swaps, everyone can enjoy these beauties.
Make-Ahead Tips
Want to get a head start? You totally can. The cupcakes themselves can be baked a day in advance and stored in an airtight container at room temperature. If you want to go further ahead, freeze the unfrosted cupcakes—they’ll keep beautifully for up to two months. Just thaw them at room temp when you’re ready to frost. The cream cheese frosting can also be made up to three days ahead. Store it in the fridge, but let it come to room temperature and give it a quick whip before piping. These little steps save time without sacrificing flavor or texture.
Storage Instructions
Once your cupcakes are beautifully frosted and ready to go, you’ll want to store them the right way to keep them tasting fresh. If you’re eating them within 24 hours, just pop them in an airtight container at room temperature. For longer storage (up to 3–4 days), place them in the fridge—just be sure to let them sit out for about 30 minutes before serving to bring back that soft, fluffy texture. Want to save some for later? You can freeze the unfrosted cupcakes for up to 2 months. Just wrap them tightly in plastic wrap and store in a zip-top freezer bag. When ready to use, thaw at room temperature and frost fresh.
FAQ
Can I make these cupcakes without food coloring?
Yes! While red food coloring gives that classic vibrant look, you can absolutely skip it. The flavor won’t change, and you’ll still get a delicious, slightly chocolatey cupcake. Natural alternatives like beetroot powder also work if you want a subtle tint.
Why do I need vinegar and buttermilk?
These acidic ingredients react with the baking soda to create a soft, airy texture. They also balance the sweetness and enhance that iconic red velvet tang.
How do I prevent my cupcakes from sinking?
Make sure not to overmix the batter, and don’t open the oven door while they’re baking. Also, check that your baking soda is fresh—it’s a key player in the rising process.
Can I use this recipe for a cake instead of cupcakes?
You sure can! Just pour the batter into two greased and lined 8-inch round pans and bake at the same temperature for about 25–30 minutes.
Is there a way to make them less sweet?
If you’re sensitive to sweetness, you can reduce the sugar in the frosting by about 50g, or swap in a tangier cream cheese brand to offset the sweetness.
Nutritional Information
Each cupcake (with frosting) contains approximately:
- Calories: 370
- Fat: 20g
- Saturated Fat: 12g
- Carbohydrates: 45g
- Sugar: 35g
- Protein: 4g
- Fiber: 1g
- Sodium: 220mg
These values are estimates and may vary based on the specific brands of ingredients you use or modifications made to the recipe.

Final Thoughts
Red velvet cupcakes are pure joy in bite-sized form. They’re simple to make, a feast for the eyes, and ridiculously satisfying to eat. Whether you’re baking them for a party, a gift, or just because your sweet tooth said so—they always deliver. There’s something deeply nostalgic yet surprisingly elegant about them, and that combo of rich cocoa, tangy frosting, and velvety texture? Unbeatable.
So go ahead—gather your ingredients, preheat that oven, and whip up a batch. You deserve a cupcake moment. And trust me, these red velvet beauties are about to become your go-to indulgence.