The Best Fluffy Pancakes recipe you will fall in love with. Full of tips and tricks to help you make the best pancakes.
Cozy Irish Soda Bread – Simple No-Knead Wonder
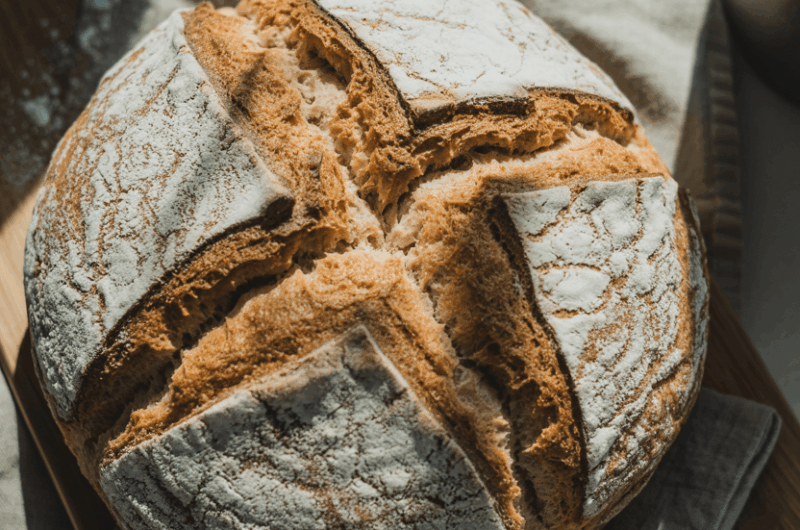
Let me just say it: I used to think homemade bread was reserved for people who mill their own flour or own some kind of artisanal starter named Herman. But this Irish soda bread changed my whole outlook. There’s no kneading, no yeast, no drama.
It’s the kind of bread you can decide to make on a whim and be pulled out of the oven an hour later. No bread-baking degree required.
The magic is in its simplicity. With a handful of pantry staples and a good stir, you get a thick, golden loaf with a crisp crust and a slightly sweet, tender interior. It’s rustic, it’s homey, and it smells like you spent the whole day baking (when really you spent maybe ten minutes).
Whether you’re prepping for St. Patrick’s Day or just need something to go with your soup, this bread is your cozy, carby friend.
Recipe Snapshot
| Category | Details |
| Yield | 1 loaf |
| Serving Size | 1 slice |
| Prep Time | 10 minutes |
| Bake Time | 45-50 minutes |
| Total Time | 1 hour |
| Calories per Serving | ~190 |
| Primary Cooking Method | Baking |
| Occasion | St. Patrick’s Day, Everyday Bake |
| Diet Type | Vegetarian |
Calories are approximate and may vary depending on exact ingredients used.
Irish Soda Bread Recipe
Course: BreadCuisine: IrishDifficulty: EasyServing Size
1
slicePrep time
10
minutesBake Time
45
minutesCalories
190
kcalIrish soda bread is the kitchen equivalent of a casual genius. It shows up with minimal effort, no yeast, no rising, and still manages to steal the spotlight. This humble loaf is all about instant gratification—you mix, shape, and bake. No waiting, no babysitting dough, no stress.
What you get is a golden-crusted, tender-crumbed bread with just a kiss of sweetness and the flexibility to go savory or sweet depending on your vibe. It’s comfort food for people who don’t want to spend the entire day cooking, but still want something that feels homemade and heartfelt.
Perfect for soups, stews, breakfast, or just slathered with butter.
Ingredients
- Dry Ingredients
4 cups (500g) all-purpose flour (plus more for hands and surface)
1 teaspoon baking soda
1 teaspoon salt
1/4 cup (50g) granulated sugar
- Fat and Liquid
4 tablespoons (60g) unsalted butter, cold and cubed
1 and 3/4 cups (420ml) buttermilk, cold
1 large egg
- Optional Add-ins
1 cup (140g) raisins or currants
Directions
- Preheat Oven & Choose Your Pan
Preheat your oven to 400°F (204°C). Decide which pan you’re using: a baking sheet lined with parchment paper or a silicone mat will work, but the bread will spread more. Want that crusty-bottomed, rustic feel?
Go with a seasoned cast iron skillet, a greased cake or pie pan, or even a 5-quart (or larger) Dutch oven. If using a Dutch oven, keep the lid off while baking. - Whisk the Wet Ingredients
In a medium bowl or large measuring cup, whisk together the cold buttermilk and the egg until combined. Set aside for later. - Mix the Dry Ingredients
In a large bowl, whisk together the flour, sugar, baking soda, and salt until fully blended. It’ll look fluffy and even. Toss in your raisins or currants if you’re using them and give it a stir to coat them in flour. - Cut in the Butter
Drop the cold, cubed butter into the dry mix. Use a pastry cutter, fork, or your fingertips to blend it in until you get a crumbly texture with pea-sized bits of butter scattered throughout. - Add the Wet Ingredients
Pour the buttermilk and egg mixture into the dry ingredients. Use a wooden spoon or spatula to gently fold everything together.
The dough will be very heavy, stiff, and shaggy. When stirring becomes nearly impossible, move to the next step. - Form and Knead
Lightly flour your counter and dump the dough out onto it. With floured hands, gently bring the dough together into a ball. Knead it just until all the flour is moistened and the dough feels cohesive—about 30 seconds. If it’s too sticky, sprinkle a bit more flour over it. - Shape and Score
Transfer the shaped dough to your prepared pan. Using a sharp knife or bread lame, slash a deep X across the top, about 1/2 inch deep. This helps the bread cook evenly and creates that traditional soda bread look. - Bake
Slide it into the oven and bake for 45 to 55 minutes. If it’s browning too fast on top, tent it loosely with aluminum foil. For best accuracy, check the center of the loaf with an instant-read thermometer; it should read about 195°F (90°C). - Cool and Enjoy
Once it’s baked, take the bread out of the oven and let it cool for 10 minutes in the pan. Then transfer it to a wire rack to cool further. Serve it warm, at room temperature, or toasted with butter, jam, or whatever toppings you love.
Extra Tips
- Go Easy on the Mixing
A key to perfect soda bread is treating the dough gently. Overworking it can lead to a dense, chewy loaf. Mix just until everything comes together—it’s meant to look rustic and a little scrappy. - Keep Ingredients Cold
Cold butter and buttermilk are your best friends here. They create steam as the bread bakes, adding that flaky interior and beautiful rise. Room temp butter just won’t cut it. - Add Flavors Smartly
Raisins and currants are classic, but why stop there? Dried cranberries, walnuts, or even a sprinkle of orange zest can jazz things up. Just keep the total mix-ins under 1 cup to avoid overwhelming the dough. - Mind the Oven Heat
If your loaf starts browning too quickly on top, tent it with foil about halfway through baking. This trick helps it bake evenly without scorching the crust. - Let It Rest Before Slicing
As hard as it is, let the bread cool for at least 15 minutes before cutting. This helps it finish setting inside and makes cleaner slices. Fresh-baked smell plus patience? Totally worth it.
Equipment List
- Mixing bowls (large and medium)
- Measuring cups and spoons
- Whisk
- Pastry cutter or fingers
- Wooden spoon or spatula
- Baking sheet
- Parchment paper or silicone mat
- Cooling rack
- Sharp knife for scoring
Make-Ahead Tips
Prepping Dry Ingredients
You can mix all the dry ingredients—flour, sugar, baking soda, salt, and even the raisins—a day or two ahead of baking. Store the mix in an airtight container at room temperature, and you’ll cut your kitchen time in half on bake day.
Butter & Egg Prep
Cube the butter and store it in the fridge so it’s ready to go cold into the dough when needed. You can also crack and beat the egg in advance, storing it in a covered container in the refrigerator. Just don’t combine it with the buttermilk until right before baking.
Baking in Advance
You can bake the entire loaf a day ahead with no flavor sacrifice. After the loaf cools completely, wrap it snugly in plastic wrap and then a layer of foil. This locks in moisture and keeps the crust from drying out.
Reheating for Freshness
If you’re storing the bread, reheat it in a 300°F (150°C) oven for about 10 minutes before serving. It revives the crust and brings back that fresh-baked aroma that makes this bread so special.
Storage Instructions
Once your soda bread has cooled completely, you’ve got a few solid options to keep it fresh. At room temperature, wrap the loaf tightly in plastic wrap or store it in an airtight container. It’ll stay nice and soft for about two days. Avoid refrigerating it, though—the fridge can dry it out and mess with the texture.
If you want to freeze it, make sure the loaf is fully cooled. Wrap it tightly in plastic wrap, then again in aluminum foil to protect it from freezer burn. It’ll keep in the freezer for up to three months. When you’re ready to enjoy, thaw it overnight at room temperature. To refresh that golden crust, pop it in a 300°F (150°C) oven for about 10 minutes.
Tip for Sliced Storage
You can also freeze individual slices. Wrap each one in plastic wrap and place them in a zip-top freezer bag. This way, you can grab a slice whenever a bread craving hits—just toast straight from frozen. Handy for rushed mornings or surprise guests!
How to Serve It Best
Irish soda bread is one of those magical recipes that can swing sweet or savory with barely any effort. Serve thick slices warm with a generous swipe of salted butter for a rustic breakfast or snack. Pair it with clotted cream and jam if you want to get fancy—perfect for afternoon tea vibes.
On the savory side, it’s unbeatable alongside a hearty bowl of Irish stew, potato soup, or even a plate of eggs and bacon. Leftover slices? Toast them and top with sharp cheddar and chutney for a cozy, flavor-packed lunch. It even works with soft cheeses and a drizzle of honey if you’re aiming for something a bit more gourmet.
Nutritional Information
Based on a standard loaf sliced into 10 equal portions, here’s the approximate nutritional breakdown per slice:
- Calories: 190
- Total Fat: 6g
- Saturated Fat: 3.5g
- Cholesterol: 35mg
- Sodium: 350mg
- Carbohydrates: 30g
- Fiber: 1g
- Sugars: 5g
- Protein: 4g
Note: These values are estimates and may vary depending on your exact ingredients and portion sizes.

Reader Questions Answered
Can I add nuts or other mix-ins?
Absolutely. Chopped nuts like walnuts or pecans are great additions, just keep the total add-ins (including raisins or other dried fruits) to about 1 cup so the dough holds together.
The dough feels too wet—what should I do?
This is a common concern. Start with about 300 ml of buttermilk and add more only as needed. If your dough still feels too wet, sprinkle in a little extra flour a tablespoon at a time until it’s workable.
Can I skip the egg?
Yes, you can. The egg adds richness and structure, but if you’re out or avoiding it, just increase the buttermilk slightly to compensate. The bread will still bake up beautifully.
How do I know when it’s done baking?
Tap the bottom of the loaf—if it sounds hollow, it’s done. A toothpick inserted in the center should also come out clean. You’re aiming for a deep golden crust.
Can I make this gluten-free?
You can try using a 1:1 gluten-free flour blend designed for baking. Results may vary slightly in texture, but several bakers have had success with it.