The Best Fluffy Pancakes recipe you will fall in love with. Full of tips and tricks to help you make the best pancakes.
Butter Swim Biscuits That Practically Make Themselves
You ever have one of those mornings where you want something homemade but your motivation level is somewhere between “nah” and “I’ll just drink coffee”? That was me last weekend. But then I remembered these golden, buttery miracles: Butter Swim Biscuits.
They take minimal effort, don’t require fancy gadgets, and taste like grandma herself blessed your kitchen. These biscuits aren’t just baked, they’re bathed—in butter. Like, literally swimming in it. Sounds wild? Oh, just wait till you try ’em.
They’re crispy-edged, pillow-soft in the middle, and they puff up like little golden clouds. You just stir, pour, bake—and suddenly you’re a biscuit boss.
No rolling pins, no cutters, no stress. Just biscuits that melt in your mouth and make you feel like a Southern baking legend.
Recipe Snapshot
| Category | Details |
| Yield | 9 biscuits |
| Serving Size | 1 biscuit |
| Prep Time | 10 minutes |
| Bake Time | 25 minutes |
| Total Time | 35 minutes |
| Calories per Serving | ~320 |
| Primary Cooking Method | Baking |
Calories are approximate and may vary depending on exact ingredients used.
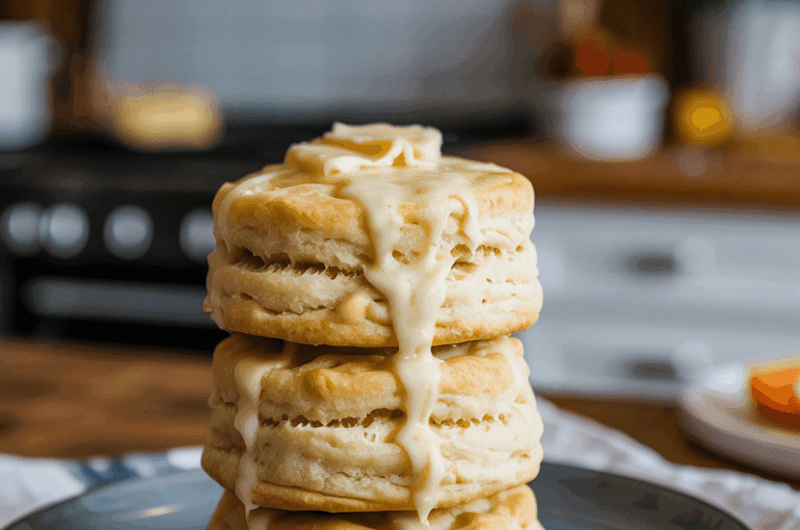
Butter Swim Biscuits
Course: DessertCuisine: American SouthernDifficulty: EasyServings
1
biscuitPrep time
10
minutesBake Time
25
minutesCalories
320
kcalNever heard of butter swim biscuits? Let me paint you a picture. Imagine a lazy Saturday morning, and you’re in your kitchen whipping up a thick, simple batter. No fuss.
Then, you pour it into a baking dish filled with melted butter—yes, an actual pool of it. While they bake, these bad boys soak up the golden goodness like little carb sponges. The result?
A crispy, golden crust on the outside, tender and fluffy on the inside. It’s cozy, rich, and ridiculously easy—like a buttery hug for your taste buds.
Ingredients
2 1/2 cups all-purpose flour
4 teaspoons baking powder
1 tablespoon granulated sugar
1/2 teaspoon salt
1 3/4 cups whole milk (room temperature)
1/2 cup (1 stick) unsalted butter (melted)
Directions
- Preheat and Prep
Crank your oven up to 450°F (232°C). Grab an 8×8-inch baking dish and pour the melted butter straight in. Don’t grease it—the butter does that job deliciously. - Mix the Dry Stuff
In a large mixing bowl, whisk together the flour, baking powder, sugar, and salt. Make sure everything is evenly combined so your biscuits rise like champs. - Add the Milk
Pour the milk into the dry mixture and gently stir until just combined. The dough will be wet and sticky, almost like thick pancake batter. Don’t overmix—we’re not making rubbery biscuits here. - Pour into the Butter Bath
Carefully transfer the dough into your butter-filled baking dish. Use a spatula to spread it evenly, letting the butter creep up around the edges. It should look like the dough is floating in a buttery jacuzzi. - Score the Squares
Using a butter knife, lightly score the top of the dough into 9 equal squares. This helps the biscuits bake evenly and gives them a rustic, pull-apart vibe. - Bake to Golden Glory
Pop the dish into your hot oven and bake for 25 minutes, or until the top is golden brown and a toothpick comes out clean. The edges will be crispy and bubbling with buttery goodness. - Cool Slightly & Serve
Let the biscuits rest for 5 minutes so you don’t burn your tongue in your biscuit-fueled excitement. Then dig in! Serve warm with honey, jam, or more butter (because why not?).
Extra Tips
- Use Room Temp Milk: Cold milk can stiffen the melted butter too quickly. Room temp milk keeps the texture smooth and easy to mix.
- Don’t Skip the Scoring: That light cut on top? It helps steam escape and gives you clean, even pull-apart squares.
- Use High-Quality Butter: Since butter is the star, splurging on a good one really makes a difference in flavor.
- Pan Size Matters: Stick to the 8×8-inch dish. Anything larger can spread the dough too thin, and you’ll lose that puffy, tender center.
- Double It for a Crowd: Just double the ingredients and use a 9×13-inch pan. You’ll get the same golden results—just more of them to love.
Equipment List
- 8×8-inch baking dish
- Mixing bowl
- Whisk
- Measuring cups and spoons
- Spatula
- Butter knife
Substitution Options
Need to tweak the recipe? No problem:
- Dairy-Free: Swap out the butter with a good-quality vegan butter, and use unsweetened almond milk or oat milk instead of whole milk. They’ll still bake up beautifully.
- Gluten-Free: A 1:1 gluten-free all-purpose flour blend can be used in place of regular flour. Look for one that contains xanthan gum for best results.
- Low-Sodium: Reduce the salt by half or use a salt substitute. The flavor from the butter still keeps things delicious.
- Sugar-Free: You can omit the sugar or use a pinch of a sugar substitute if you’re watching your sugar intake. It won’t affect the texture.
Make-Ahead Tips
Want to get ahead of the biscuit game? Here’s how to prep these buttery beauties in advance:
- Mix the Dry Ingredients Early: Combine the flour, baking powder, sugar, and salt and store in an airtight container. It’ll keep for up to a week at room temp.
- Pre-Make the Dough: You can mix the full dough (minus the butter bath) the night before. Cover tightly and refrigerate overnight. When ready to bake, just melt the butter, pour it in the dish, and add the chilled dough.
- Freeze for Later: Prepare and score the dough in the buttered dish, then freeze it. When you’re ready, bake straight from frozen—just add 5–7 extra minutes to the bake time.
Perfect for busy mornings, lazy brunches, or those “I-need-comfort-food-now” moments.
Storage Instructions
Got leftovers? (Unlikely, but hey, it happens.) Here’s how to keep them tasty:
- Room Temp: Store any cooled leftover biscuits in an airtight container at room temperature for up to 2 days. Just pop them in the microwave for 10–15 seconds to bring back the softness.
- Refrigerator: To keep them fresh longer, refrigerate in an airtight container for up to 5 days. Reheat in the oven at 350°F for 5–7 minutes to restore that crispy edge.
- Freezer: These freeze like champs! Wrap each biscuit individually in plastic wrap, then place them in a freezer-safe bag. They’ll last for up to 2 months. To enjoy, thaw overnight and warm up in the oven.
Whether you’re saving a batch or stretching the goodness over a week, these storage tips have you covered.
FAQ
Can I use self-rising flour instead of all-purpose flour?
Yes! If using self-rising flour, just skip the baking powder and salt since those are already included.
What if I don’t have whole milk?
No biggie. You can use 2%, buttermilk, or even evaporated milk in a pinch. Each gives a slightly different flavor but all work fine.
Can I add cheese or herbs?
Absolutely. Stir in shredded cheddar, chopped chives, or even cooked bacon bits for a fun flavor twist. Just mix them in with the dry ingredients.
Why are my biscuits dense?
You might’ve overmixed the dough. Gently stir until just combined—lumps are totally fine.
Can I reheat them in the microwave?
Yes, about 10–15 seconds per biscuit does the trick. But for that crispy edge, the oven or toaster oven works best.
Food Safety
While these biscuits are simple, food safety still matters:
- Butter Handling: Always use fresh, unsalted butter and keep it refrigerated until ready to melt.
- Milk Matters: Make sure your milk is within its expiration date and kept cold until use. Room temp milk is great for baking but only let it sit out just before mixing.
- Clean Hands & Tools: Wash your hands before handling any ingredients and make sure all utensils and bowls are clean.
- Proper Storage: Don’t leave cooked biscuits at room temperature for more than 2 days. Refrigerate or freeze leftovers promptly to avoid spoilage.
Baking is fun—but let’s not mess with bacteria, okay?
Serving Suggestions
These buttery beauties are versatile and fit just about any meal:
- Breakfast Glory: Slather with honey or jam, or use them as a base for sausage gravy.
- Brunch Starters: Pair with scrambled eggs, crispy bacon, or a breakfast casserole.
- Dinner Rolls Upgrade: Serve alongside soup, chili, or roasted chicken for a comforting finish.
- Sweet Twist: Try them with a drizzle of maple syrup or topped with whipped cream and berries for a quick dessert.
They’re warm, golden, and ready to soak up whatever goodness you throw their way.
Nutritional Information
Per Biscuit (1 of 9 servings):
- Calories: 244
- Fat: 11g (Saturated: 7g)
- Cholesterol: 29mg
- Sodium: 527mg
- Carbs: 31g (Fiber: 1g, Sugars: 4g)
- Protein: 5g
- Vitamin C: 1mg | Calcium: 184mg | Iron: 2mg | Potassium: 113mg
Percent Daily Values are based on a 2,000 calorie diet. Your daily values may vary.
Final Thoughts
If comfort food had a love language, butter swim biscuits would be whispering sweet nothings all day long. They’re buttery, fluffy, easy, and dangerously addictive. Whether you’re treating yourself, impressing brunch guests, or just need something cozy on a rainy day—this recipe’s got you. Trust me, once you’ve had biscuits that swim in butter, there’s no going back. So go ahead, preheat that oven and let the magic happen.