The Best Fluffy Pancakes recipe you will fall in love with. Full of tips and tricks to help you make the best pancakes.
San Sebastian Cheesecake: The Burnt Beauty I Can’t Stop Baking
Ever made something “wrong” on purpose and had it turn out better than perfect? That’s basically the entire vibe of the San Sebastian Cheesecake. It’s burnt, it’s cracked, it’s jiggly—and it’s absolutely glorious.
The first time I made it, I thought I’d ruined dessert. Instead, I had friends begging me to bring it again next weekend. Now it’s my go-to showstopper when I want all the wow without the stress.
This article is my full love letter to this stunning cheesecake: what makes it different, how to make it silky and scorched just right, and all the juicy details you’ll wish someone had told you sooner. Let’s dive in!
Recipe Snapshot
| Category | Details |
| Yield | 1 cheesecake (8–10 servings) |
| Serving Size | 1 slice |
| Prep Time | 15 minutes |
| Bake Time | 50–60 minutes |
| Total Time | 1 hour 15 minutes |
| Calories per Serving | ~420 |
| Primary Cooking Method | Baking |
| Cooling Time | 3–4 hours (preferably overnight) |
| Occasion | Dinner parties, holidays, indulgent weekends |
| Diet Type | Gluten-free friendly |
Calories are approximate and may vary depending on exact ingredients used.
San Sebastian Cheesecake
Course: DessertCuisine: Spanish (Basque)Difficulty: EasyServings
1
slicePrep time
15
minutesBake Time
50
minutesCalories
420
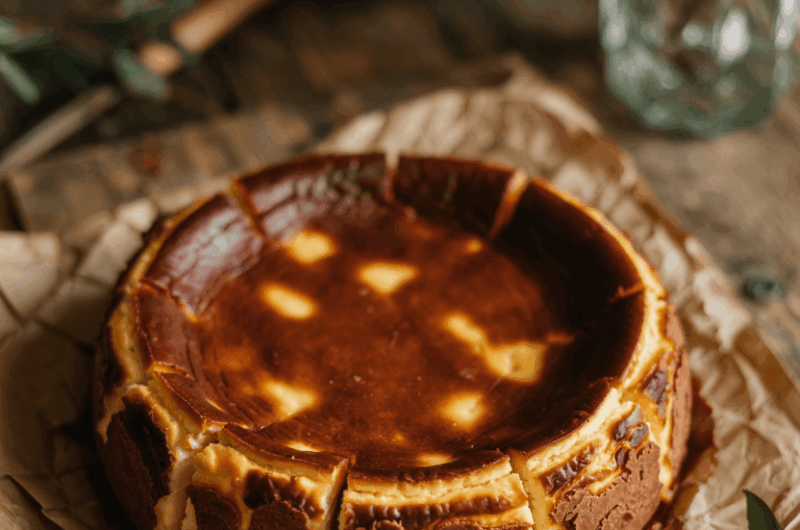
kcalIf cheesecake had a rebellious twin, this would be it. San Sebastian Cheesecake—aka Burnt Basque Cheesecake—is all about breaking the rules.
No crust, no water bath, and you literally want to burn the top. The result? A rich, creamy inside with a caramelized top layer that tastes like cheesecake meets crème brûlée. Trust me, this one’s a game-changer.
Ingredients
2 lbs (900g) cream cheese, room temperature
1 1/2 cups (300g) granulated sugar
6 large eggs, room temperature
2 cups (480ml) heavy cream
1/4 cup (30g) all-purpose flour (or gluten-free 1:1 flour)
1/2 tsp fine sea salt
1 tsp pure vanilla extract
Directions
- Prep the Pan Like a Pro
Grab a 9-inch springform pan and line it with two oversized sheets of parchment paper. You want the paper to extend 2–3 inches above the rim to hold in that puffed-up beauty. Crisscross the sheets to fully cover the base and sides. No butter or spray—just parchment. Embrace the wrinkles—it’s rustic! - Cream the Cream Cheese
Toss your room temp cream cheese into a large mixing bowl or stand mixer. Beat it on medium for 2–3 minutes until it’s cloud-level fluffy and lump-free. Don’t rush—any leftover clumps will haunt you later. - Sugar, Meet Cheese
With the mixer running, slowly rain in the sugar. Let it blend for another 1–2 minutes until the mix becomes glossy and satiny smooth. Scrape down the bowl halfway through for even mixing. - Add Eggs One by One
This is the patience zone. Crack in each egg one at a time, letting it fully incorporate before adding the next. Medium-low speed is your friend here. The batter should turn smooth and velvety, not foamy. - Cream & Vanilla Time
Pour in the heavy cream, vanilla extract, and sprinkle in the salt. Mix on low until it’s combined and dreamy-looking. Stop as soon as it’s homogenous—you don’t want to whip too much air into it. - Sift and Fold in Flour
Sift the flour directly into the batter using a mesh sieve. Then gently fold it in with a spatula or mix on low speed. This step thickens the batter slightly and gives it structure—skip it, and you’ll get pudding instead of cheesecake. - Fill That Pan
Pour the batter into your parchment-lined pan. It should almost reach the top. Tap the pan gently on the counter to pop any surface bubbles. If you’re feeling fancy, swirl the top with a spatula for dramatic burn marks. - Bake to Burnt Perfection
Place the pan in a preheated oven at 400°F (200°C). Bake for 50–60 minutes. At 50 minutes, check for doneness: the top should be dark brown with cracks, and the center should still jiggle like a flan. Don’t overbake—it firms up as it cools. - Cool with Patience
Let the cheesecake cool in the pan at room temp for at least 1 hour. It’ll sink slightly and firm up. Don’t panic—that’s normal. - Chill Before Slicing
Transfer the cooled cheesecake (still in the parchment) to the fridge. Chill for at least 3 hours, ideally overnight. When ready to serve, lift it out using the parchment, slice with a hot knife, and prepare for applause.
Extra Tips
- Room temperature is key: Make sure all your ingredients—especially the cream cheese and eggs—are fully at room temp. This makes blending smoother and prevents lumps.
- Check oven hotspots: If your oven has hot spots, rotate the cheesecake halfway through for even browning.
- Let it jiggle: That little wiggle in the center? That’s your sign of success. The cheesecake sets up as it cools.
- Use a serrated knife: A hot, clean serrated knife gives you clean, restaurant-style slices.
- Skip perfection: Cracks, dark edges, uneven tops—this cheesecake is meant to be rustic and wild. Embrace it!
Equipment List
- 9-inch springform pan
- Large mixing bowl or stand mixer
- Electric hand mixer (if not using stand mixer)
- Rubber spatula
- Measuring cups and spoons
- Kitchen scale (optional but helpful)
- Sifter or fine mesh sieve
- Parchment paper
- Sharp knife for slicing
- Cooling rack (optional)
- Oven thermometer (for accuracy)
Substitutions & Variations
This recipe keeps it pretty minimal, which makes it hard to swap out ingredients—but don’t worry, I’ve got a few solid options if you’re looking to shake things up or need alternatives.
Flour: Want to make this gluten-free? Swap the regular all-purpose flour with a gluten-free 1:1 baking flour. It works like a charm and you won’t notice a thing.
Flavor Options: Not in a vanilla mood? No problem. Try orange extract for a citrusy zing, or go classy with some lemon zest folded into the batter. It gives the cheesecake a refreshing twist that balances the richness.
Serving Suggestions: Even though this cheesecake slays on its own, you can dress it up! A drizzle of raspberry coulis, salted caramel, or a spoonful of cherry preserves makes it a next-level dessert. Fresh berries or a dusting of powdered sugar work great for a light finish too.
Make-Ahead Tips
This cheesecake is practically begging to be made ahead—and it actually tastes better when you do! Here’s how to prep like a pro:
- Bake the day before: This dessert needs to chill for a few hours anyway, but letting it rest overnight gives it the perfect creamy-firm texture and deepens the flavor.
- Wrap and store: Once cooled to room temp, keep it in the pan (parchment and all), cover tightly with plastic wrap or foil, and refrigerate.
- Serving day simplicity: On the big day, just lift it out, slice, and plate. It holds its shape beautifully and slices like a dream after chilling overnight.
Storage Instructions
Left with extras? That’s not a problem—it’s a gift. Here’s how to store your cheesecake so it stays luscious and delicious for days:
- Refrigerator: Store leftover slices in an airtight container or wrap the entire cheesecake (still on its base) with plastic wrap. It’ll stay fresh in the fridge for up to 5 days. Just let it sit out for 10–15 minutes before serving for the best texture.
- Freezer: Want to stash some for later? Wrap individual slices tightly in plastic wrap and foil, then freeze. They’ll keep well for up to 2 months. Thaw overnight in the fridge or for a couple of hours at room temp.
- Avoid soggy crust (if added): If you go rogue and add a crust, freezing may affect the texture—stick to fridge storage for best results.
Frequently Asked Questions
Can I use a different pan size?
Yes, but keep in mind that using a smaller or larger pan will affect the baking time and texture. A 9-inch springform is ideal for this recipe, but you can adjust slightly—just keep an eye on that baking time.
Why does my cheesecake crack or sink in the middle?
Totally normal! San Sebastian Cheesecake is supposed to look imperfect. Cracks and a sunken middle are part of its rustic charm.
Can I make this dairy-free or vegan?
There are some great recipes out there using vegan cream cheese and coconut cream. However, you’ll need to follow a specialized vegan Basque cheesecake recipe for best results—it’s not a direct one-to-one swap.
How do I know it’s done baking?
The top should be dark brown and the center should jiggle when you shake the pan. It sets as it cools, so don’t overbake.
Can I add toppings or mix-ins?
You bet. Just keep it light—fruit compotes, caramel drizzle, or a few chopped nuts can all enhance the flavor without taking away from the cheesecake’s signature texture.
How long should I chill it before serving?
At least 3–4 hours in the fridge, but overnight is even better for that dense, creamy finish.
Nutritional Information
| Nutrient | Amount |
| Calories | ~420 kcal |
| Total Fat | 36g |
| Saturated Fat | 20g |
| Cholesterol | 190 mg |
| Sodium | 250mg |
| Carbohydrates | 19g |
| Sugars | 17g |
| Protein | 7g |
These values are approximate and will vary based on brands and portion sizes. Treat it as a splurge-worthy dessert, not a diet food.

Final Thoughts
This San Sebastian Cheesecake is one of those rare desserts that delivers every time. It’s low-effort, high-reward, and unapologetically dramatic. No crust, no fuss—just a creamy center and that golden, scorched top that makes you look like a baking genius even on your laziest day.
Serve it plain or dress it up, slice it thick or thin—this cheesecake doesn’t judge. It just wins. Try it once, and I promise it’ll become your go-to for those moments when you need something both comforting and impressive.
Happy baking!