The Best Fluffy Pancakes recipe you will fall in love with. Full of tips and tricks to help you make the best pancakes.
Soft and Fluffy Sourdough Sandwich Bread Recipe You Can Trust
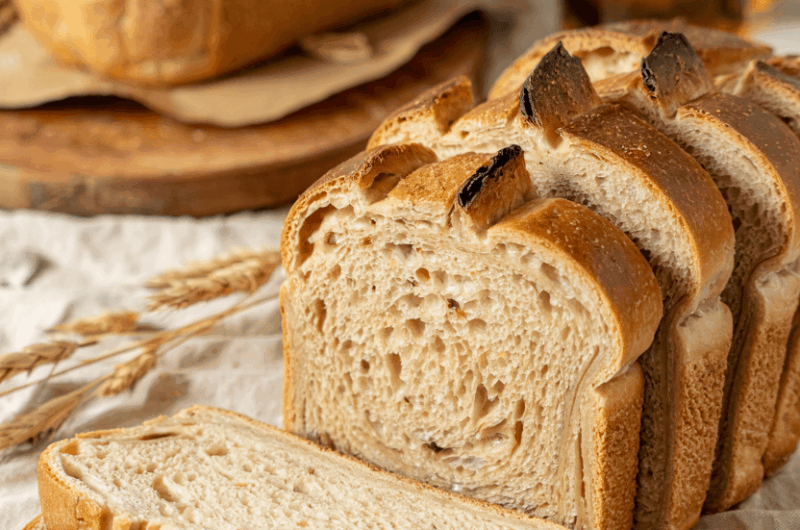
There’s nothing like the comfort of a soft, thick slice of sourdough sandwich bread, especially when it’s homemade. Unlike rustic sourdough loaves with crunchy crusts and chewy interiors, this one is perfectly soft and airy — ideal for grilled cheese, deli sandwiches, or a buttery morning toast. I make it when I want something wholesome but easy enough to slice for the entire week.
You don’t need any fancy techniques or professional tools. And even if it’s your first time baking with sourdough starter, don’t worry—I’ll guide you through every step to make sure your bread rises beautifully and bakes evenly.
This recipe is all about balance: soft crumb, tender crust, and that signature sourdough tang without being overwhelming. Let’s get started with this must-try sandwich bread that your whole family will love.
Recipe Snapshot (Quick Facts)
| Category | Details |
| Yield | 1 standard loaf (9×5) |
| Serving Size | 1 slice |
| Prep Time | 20 minutes |
| Make Time | 35 minutes |
| Total Time | 12 to 18 hours (includes fermentation) |
| Calories per Serving | ~160 |
| Primary Cooking Method | Baking |
| Resting Time | 30 minutes |
| Proofing Time | 6 to 8 hours total |
| Diet Type | Vegetarian |
| Occasion | Everyday, Meal Prep |
Calories are approximate and may vary depending on exact ingredients used.
Sourdough Sandwich Bread
Course: BreadCuisine: AmericanDifficulty: Medium1
slice20
minutes35
minutes160
kcalSourdough sandwich bread is a soft and versatile loaf that combines the classic tang of sourdough with a tender, enriched crumb. It differs from crusty artisan sourdough by using ingredients like milk, butter, and sugar to create a more tender structure that holds up beautifully for sandwiches or toast.
What makes it so special is its ability to stay fresh for several days, thanks to the natural fermentation and milk-based dough.
This loaf is proofed for several hours, giving the bread time to develop flavor while keeping the crust soft and the crumb plush. Unlike rustic boules, it’s shaped into a loaf pan for a uniform slice every time.
Whether you’re new to sourdough or a seasoned baker looking for a more kid-friendly loaf, this recipe offers the perfect balance of ease and excellence.
Ingredients
3 1/4 cups (390g) all-purpose flour or bread flour
1/2 cup (120g) active bubbly sourdough starter
1 cup (240ml) whole milk, room temperature
2 tablespoons (28g) unsalted butter, softened
1 tablespoon (12g) sugar
1 teaspoon (6g) fine sea salt
- Optional
1 egg (for brushing the top)
Directions
- Mix the Dough Ingredients Thoroughly
In a large mixing bowl, combine your sourdough starter, room temperature milk, sugar, and softened butter. Whisk until smooth and uniform.
Add the flour and salt, then mix everything together using a wooden spoon or dough whisk until no dry spots remain. The dough should be sticky but cohesive.
After mixing, let the dough rest for 30 minutes.
This step, known as autolyse, allows the flour to absorb the liquids and begin gluten development, making the dough easier to handle later. - Strengthen the Dough with Stretch and Folds
Once rested, begin a series of 3 stretch-and-fold sessions, spaced 30 minutes apart. For each session, use damp hands to lift one side of the dough and fold it over the center. Rotate the bowl and repeat on the other sides until all four corners have been folded.
These folds help align and strengthen gluten strands, replacing traditional kneading and ensuring the bread has a good rise and structure. Cover the bowl with a damp towel or plastic wrap between each set. - Bulk Fermentation (First Rise)
After the final stretch-and-fold, cover the dough and allow it to ferment at room temperature for 6 to 8 hours.
The dough should roughly double in size and feel light and airy. You’ll notice small bubbles forming under the surface, a good sign that your sourdough is active.
If your kitchen is cold, place the dough inside a turned-off oven with the oven light on, or near a warm spot like a water heater. - Shape the Dough into a Tight Log
Lightly flour your work surface and turn the dough out gently without punching it down. Press the dough into a loose rectangle, roughly the length of your loaf pan.
Fold the top third down and the bottom third up, like folding a letter.
Then roll the dough into a tight log. This shape helps create tension on the outside, encouraging a nice dome during the final proof and bake. - Final Proof in the Loaf Pan
Grease a standard 9×5 inch loaf pan with butter or oil. Place the dough log into the pan, seam-side down.
Cover with plastic wrap or a damp towel and allow it to rise again for 2 to 4 hours, or until the top of the dough crowns at least 1 inch above the pan.
You can lightly press a fingertip into the dough; if it springs back slowly and leaves a slight indent, it’s ready. - Preheat your oven to 375°F (190°C) during the last 30 minutes of proofing. If you want a glossy, golden crust, beat one egg and gently brush the top of the dough with it right before baking.
Bake the loaf for 35 to 40 minutes, rotating halfway through for even browning. The crust should turn deep golden and the loaf should sound hollow when tapped. To confirm doneness, insert a thermometer—it should read 195°F to 200°F in the center.
Let the loaf cool in the pan for 10 minutes, then carefully remove and cool fully on a wire rack before slicing.
Extra Tips for a Perfect Loaf
- Use room temperature ingredients for best fermentation.
- Don’t rush the proof. The dough should feel airy and jiggly before baking.
- Use a sharp serrated knife to get clean slices once the loaf is cooled.
- Avoid slicing while hot—it compresses the crumb and lets moisture escape.
Equipment List
Having the right tools makes the baking process smoother and more enjoyable. Here are the essentials you’ll need:
- Kitchen scale (recommended for precise measurements)
- Large mixing bowl
- Dough whisk or wooden spoon
- Bench scraper or dough scraper
- Loaf pan (9×5 inch)
- Clean kitchen towel or plastic wrap
- Pastry brush (for egg wash)
- Instant-read thermometer
- Wire rack (for cooling)
Make-Ahead Tips
- Overnight bulk fermentation: After step 3, place the covered dough in the fridge overnight (8 to 12 hours). This deepens the sourdough flavor.
- Chill the shaped dough: You can also refrigerate the dough after shaping. Allow extra time during the final proof as it warms back to room temperature.
- Freeze for later: Bake the loaf as usual, let it cool, then wrap tightly and freeze whole or in slices.
Storage Instructions
Proper storage helps keep your bread fresh longer:
- Room Temperature: Once fully cooled, store in a bread bag, foil, or airtight container for up to 4 days. Avoid plastic wrap alone, as it encourages moisture buildup.
- Refrigerator: Not recommended as it can dry out the bread.
- Freezer: Slice the loaf, place parchment between slices, and freeze in a zip-top bag. Pull out and toast as needed.
Ingredient Selection: Why It Matters
- Sourdough Starter: Needs to be recently fed, bubbly, and active. A weak starter won’t leave the bread well.
- Flour: Bread flour gives the loaf a chewier crumb, while all-purpose flour results in a more tender texture. Use whichever you prefer.
- Milk: Whole milk adds richness and moisture. For dairy-free options, use oat milk or almond milk.
- Butter: Adds flavor and softness. Can be substituted with olive oil or vegan butter.
Frequently Asked Questions
Q: Can I use sourdough discard?
No. Discard doesn’t have enough active yeast and bacteria to properly rise this enriched dough.
Q: Can I add seeds or herbs?
Yes! Add 1 to 2 tablespoons of sesame, poppy seeds, or chopped herbs during the mix.
Q: My bread didn’t rise. What went wrong?
Your starter might not have been active. Make sure it doubles in volume within 4 to 6 hours before using.
Q: How do I prevent dense texture?
Ensure full proofing and strong gluten development. Also avoid over-handling the dough during shaping.
Final Thoughts
Making sourdough sandwich bread at home is more than just a baking project—it’s a way to enjoy comfort food in its best form. From its soft crumb and golden crust to its mild sourdough flavor, this loaf is perfect for all your favorite sandwiches and toasts.
Whether you’re serving it with eggs in the morning or layering it with deli meat for lunch, this bread delivers every time. It’s freezer-friendly, beginner-friendly, and deeply satisfying. After one loaf, you might find yourself baking it weekly.


