The Best Fluffy Pancakes recipe you will fall in love with. Full of tips and tricks to help you make the best pancakes.
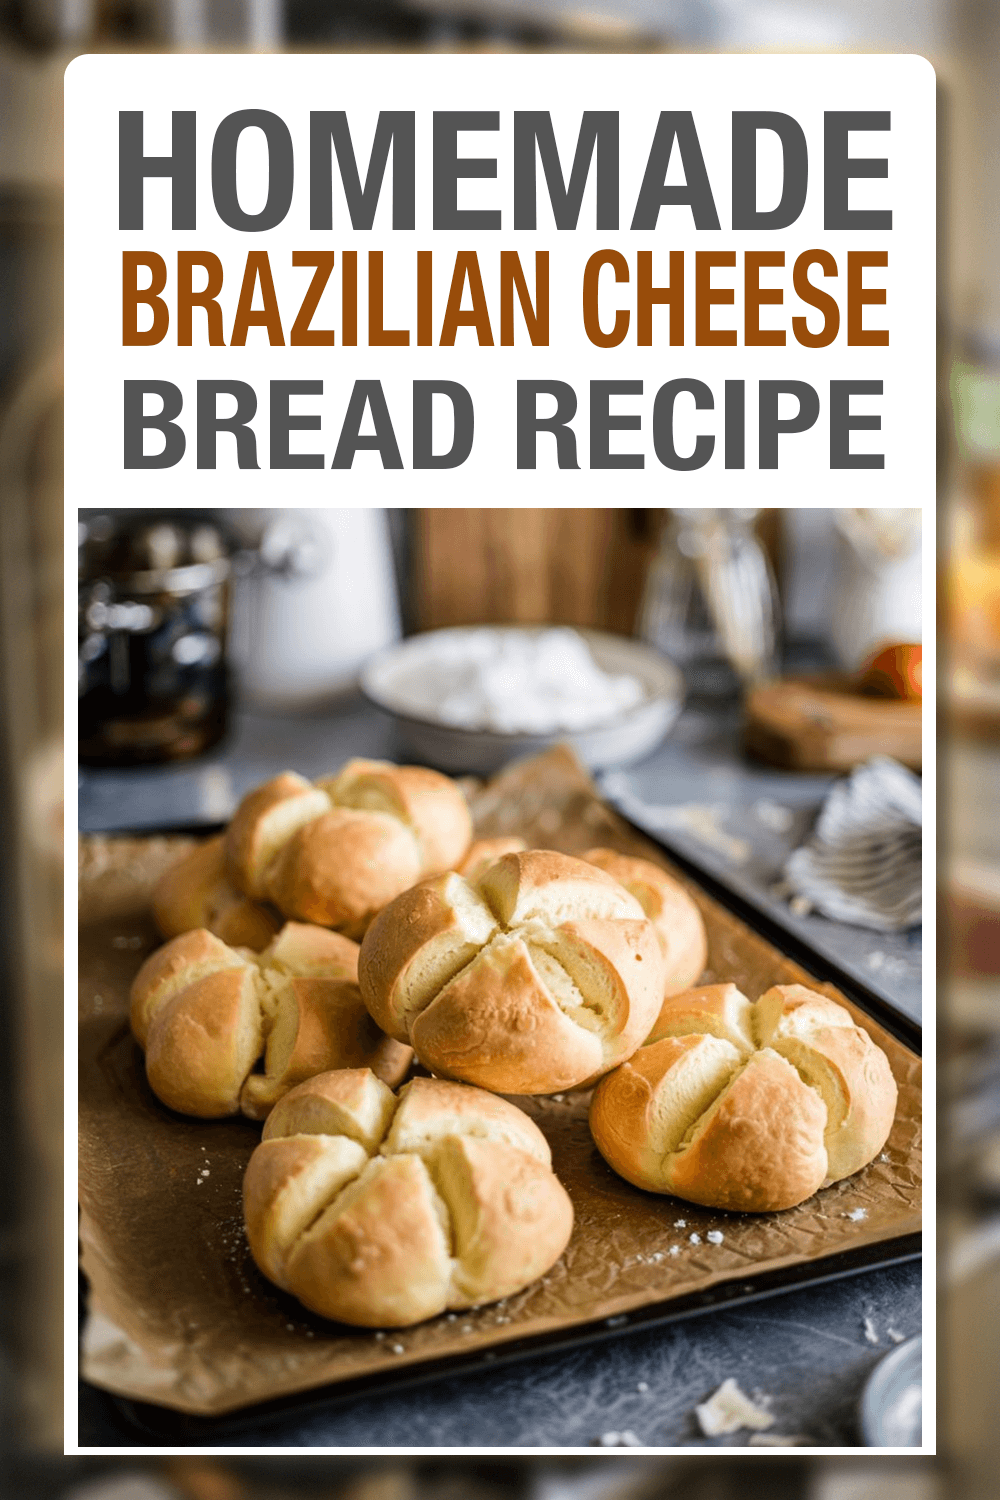
Brazilian Cheese Bread Recipe (Pão de Queijo)
Crispy on the outside, chewy on the inside, and bursting with cheesy goodness—Brazilian Cheese Bread is unlike any other bread you’ve tried. If you’ve ever walked into a Brazilian bakery or been to a churrascaria, you’ve likely been welcomed by these irresistible little puffs. They smell incredible fresh from the oven and taste even better when served warm.
These naturally gluten-free cheese breads are not only easy to make but also freeze beautifully, so you can always have some ready to go. Whether you’re hosting a party or just craving something savory and comforting, Pão de Queijo delivers every time.
Recipe Snapshot
| Category | Details |
| Yield | 18–20 cheese breads |
| Serving Size | 2 pieces |
| Prep Time | 15 minutes |
| Bake Time | 20–25 minutes |
| Total Time | 35–40 minutes |
| Calories per Serving | ~140 calories |
| Primary Cooking Method | Baking |
| Resting Time | 5 minutes |
| Occasion | Snack, Party, Breakfast |
| Diet Type | Gluten-Free |

Brazilian Cheese Bread
Course: BreakfastCuisine: BrazilianDifficulty: EasyYield
18
piecesPrep Time
15
minutesBake Time
20
minutesCalories
140
kcalBrazilian Cheese Bread, also known as Pão de Queijo, is a beloved Brazilian snack made with tapioca flour and cheese. This delightful bread has a springy texture and a light, crispy shell that sets it apart from typical bread rolls.
The dough is mixed while still warm, helping the starch gelatinize and form the unique chewy interior. It’s often eaten for breakfast in Brazil, sometimes paired with black coffee or served as an afternoon snack.
What makes this cheese bread especially appealing is how simple it is to make at home. Unlike yeasted bread, it doesn’t require proofing time, and it remains naturally gluten-free. The classic version uses Parmesan cheese, but other cheeses can be blended in for extra depth. Whether you’re introducing it to your family or recreating a taste of Brazil, this recipe is both approachable and deeply satisfying.
Ingredients
2 cups tapioca flour (also called tapioca starch)
1/2 cup whole milk
1/4 cup water
1/4 cup vegetable oil or neutral oil
1 teaspoon salt
1 large egg
1 cup grated Parmesan cheese (freshly grated is best)
1/2 cup grated mozzarella cheese (optional for added stretchiness)
Directions
- Preheat Your Oven and Prepare the Baking Sheet
Start by preheating your oven to 375°F (190°C). This ensures an even bake and allows the cheese breads to rise properly. Line a large baking sheet with parchment paper or a silicone baking mat to prevent sticking. Avoid using wax paper as it may burn.
Tip: Make sure your oven has had enough time to fully reach the desired temperature. Under-heated ovens can prevent proper puffing. - Boil the Liquid Ingredients
In a medium saucepan, combine the milk, water, vegetable oil, and salt. Place the saucepan over medium heat and bring it to a light boil. You’ll see bubbles forming around the edges, and the mixture may start to foam slightly.
Why it matters: Heating this mixture helps activate the tapioca flour’s starches later, creating the signature chewy texture that makes Brazilian cheese bread so addictive.
Once it begins boiling, immediately remove it from the heat. - Quickly pour the hot liquid into a large mixing bowl containing the tapioca flour. Stir vigorously with a wooden spoon or silicone spatula. It will seem a bit lumpy at first—this is normal.
The mixture will be sticky and slightly gelatinous. Continue stirring until fully combined and smooth. Let this mixture cool down for 5 to 7 minutes so that it doesn’t cook the egg when you add it next.
Helpful Tip: Don’t skip the cooling step. If the dough is too hot, it will scramble the egg. - Add the Egg and Cheese
Once the dough is warm (not hot), crack the egg into the bowl. Stir the egg in thoroughly. At this point, you can switch to using your hands or an electric hand mixer for better mixing.
Next, add the grated Parmesan cheese and optional mozzarella. Keep mixing until the dough becomes uniform. The mixture will be sticky, stretchy, and slightly elastic—that’s perfect.
Tip: If the dough feels too dry or isn’t coming together, add a tablespoon of milk. If it’s too loose, add a spoon of tapioca flour. - Shape the Dough into Balls
Using a cookie scoop or lightly oiled hands, scoop and shape the dough into balls about 1.5 inches wide. Place them on the prepared baking sheet, spacing them 2 inches apart to allow room for expansion.
Note: Tapioca dough is very sticky, so oiling your hands or scoop helps. You can also chill the dough slightly to make it easier to handle. - Bake Until Puffy and Golden
Place the baking sheet on the center rack of your oven and bake for 20–25 minutes, or until the cheese breads are puffed and have just a light golden hue. They should have crisp exteriors and slightly hollow-sounding centers when tapped.
Don’t overbake! The interior should stay moist and chewy, not dry or crumbly. - Rest Briefly and Serve Warm
Let the cheese breads cool for 5 minutes on the baking sheet before serving. This helps the structure set and prevents burns from hot cheese inside.
Serve them warm, ideally within 30 minutes of baking, for the best flavor and texture. They’re perfect on their own or paired with coffee, soups, or dips.
Extra Tips for Success
- Use freshly grated cheese instead of packaged grated cheese, which may contain anti-caking agents.
- Avoid overbaking to preserve the chewy inside.
- Want a uniform shape? Use a mini muffin tin and fill each cavity halfway.
Kitchen Equipment Checklist
Before you start baking, make sure you have the following tools ready:
- Medium saucepan
- Large mixing bowl
- Wooden spoon or silicone spatula
- Measuring cups and spoons
- Baking sheet
- Parchment paper or silicone baking mat
- Cookie scoop or tablespoon
- Oven
Make-Ahead and Storage Tips
One of the best things about Brazilian cheese bread is how easy it is to prepare ahead and enjoy it later without losing its appeal.
- Freezing Before Baking: Shape the dough into balls and freeze them on a tray. Once solid, transfer to a freezer bag. Bake straight from frozen—just increase baking time by 3–5 minutes.
- Freezing After Baking: Baked cheese breads can be frozen and reheated in the oven or air fryer at 350°F for 6–8 minutes.
- Refrigerating Dough: You can refrigerate unshaped dough for 24 hours, then scoop and bake the next day.
- Room Temperature Storage: Once baked, they can stay fresh in an airtight container at room temperature for up to 2 days. Reheat in a toaster oven for best results.
Ingredient Substitutions and Variations
Make this recipe fit your pantry or dietary needs with these adjustments:
- Cheese Alternatives: Swap Parmesan for aged cheddar, feta, cotija, or gouda.
- Dairy-Free Version: Use plant-based cheese and a nut milk such as almond or oat. Coconut oil can replace vegetable oil.
- Low-Fat Version: Reduce the amount of cheese slightly and use skim milk.
- Herbed Pão de Queijo: Stir in 1 teaspoon of dried herbs like oregano or thyme into the dough.
Frequently Asked Questions About Pão de Queijo
Q: Can I use all-purpose flour instead of tapioca flour?
A: No. Tapioca flour is key to the chewy texture. Other flours won’t yield the same result.
Q: How do I know when they’re done baking?
A: The outside will be lightly golden, and they’ll feel firm but still slightly springy to the touch.
Q: Can I make this recipe in a blender?
A: Yes! Combine all the ingredients in a blender and pour into a greased mini muffin tin. Bake as directed.
Q: Are Brazilian cheese breads always gluten-free?
A: Yes, as long as you use tapioca flour. There’s no wheat or other gluten-containing flour involved.
Q: Can I use different cheese combinations?
A: Absolutely. Feel free to mix Parmesan with cheddar, asiago, or even spicy pepper jack.
Final Thoughts
Whether you’re missing a taste of Brazil or just looking to bake something unique and satisfying, Brazilian Cheese Bread is a fantastic choice. It comes together with simple ingredients and delivers big on flavor and texture. Best of all, it’s gluten-free and freezer-friendly, making it a perfect recipe to keep in your rotation.
Make it once, and you’ll see why people around the world are falling in love with this Brazilian classic.