The Best Fluffy Pancakes recipe you will fall in love with. Full of tips and tricks to help you make the best pancakes.
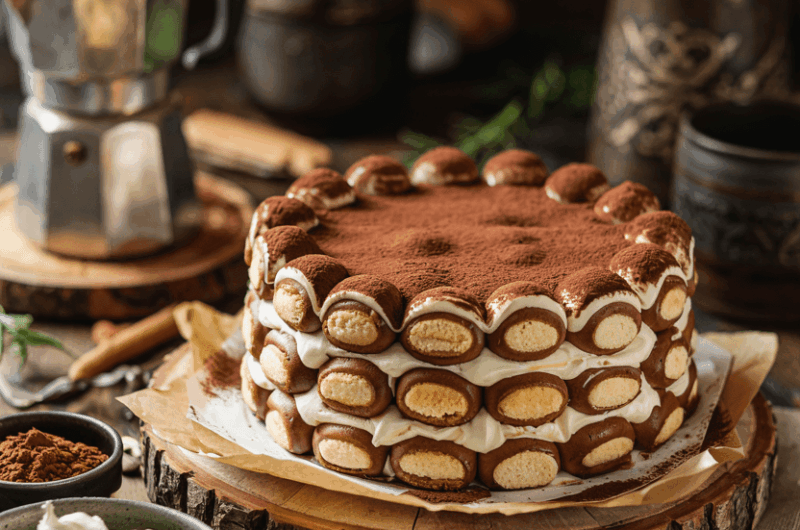
Tiramisu Cake Recipe That Feels Like a Bakery Treat at Home
There are desserts that feel indulgent, and then there is Tiramisu Cake. The perfect fusion of moist sponge, silky mascarpone, and a deep espresso punch, this is the kind of dessert that turns an ordinary dinner into a memorable occasion. I always make this for my closest friends when I want to impress without heading to a bakery.
If you’ve ever found traditional tiramisu too messy or wanted a cake you could slice cleanly and still get that rich coffee-and-cream bite—this cake is the answer. It keeps all the magic of the original but adds structure, making it ideal for birthdays, holidays, or just because.
Whether you’re new to baking or have your own apron collection, this tiramisu cake will be one of the most rewarding bakes you try.
Recipe Snapshot
| Category | Details |
| Yield | 1 cake (3 layers) |
| Serving Size | 1 slice |
| Prep Time | 35 minutes |
| Bake Time | 30 minutes |
| Total Time | 3 hours (with cooling) |
| Calories per Serving | ~420 |
| Primary Cooking Method | Baking |
| Cooling Time | 1 hour |
| Resting Time | 1 hour in fridge |
| Occasion | Holidays, Dinner Parties |
| Diet Type | Vegetarian |
Calories are approximate and may vary depending on exact ingredients used.
Tiramisu Cake Recipe
Course: DessertCuisine: ItalianDifficulty: Easy1
Slice35
minutes30
minutes420
kcalThis tiramisu cake is a layered dessert made with soft sponge cake soaked in espresso and layered with a creamy mascarpone frosting. It brings together the flavors of classic tiramisu in a more elegant and sliceable form.
You get distinct layers of vanilla sponge, infused with espresso and (optionally) a hint of coffee liqueur, paired with a whipped mascarpone filling that’s light but still rich. Unlike the traditional dessert, this version holds its shape beautifully—ideal for serving at parties or special dinners.
Ingredients for Tiramisu Cake
- For the Cake Layers:
2 1/4 cups all-purpose flour
2 1/2 tsp baking powder
1/2 tsp salt
3/4 cup unsalted butter (softened)
1 1/2 cups granulated sugar
3 large eggs
1 tbsp vanilla extract
1 cup whole milk (room temperature)
- For the Espresso Soak:
1 cup hot brewed espresso or strong coffee
1 tbsp coffee liqueur (optional)
- For the Mascarpone Filling & Frosting:
1 1/2 cups heavy cream (cold)
16 oz mascarpone cheese (cold)
3/4 cup powdered sugar
1 tsp vanilla extract
- For Topping:
Unsweetened cocoa powder, for dusting
Chocolate shavings (optional)
Directions
- Mix the Dry and Wet Ingredients Separately
Begin by preheating your oven to 350°F (175°C). Prepare three 8-inch round cake pans by greasing and lining the bottoms with parchment paper.
In a large mixing bowl, sift together the flour, baking powder, and salt. In a separate bowl, cream the softened butter with sugar using a hand mixer or stand mixer on medium-high speed. This should take about 2-3 minutes until the mixture is pale and fluffy.
Next, beat in the eggs one at a time. Scrape down the sides of the bowl as needed to ensure everything mixes evenly. Add the vanilla extract. - Combine and Mix the Batter
Gradually add the dry ingredients to the wet ingredients in three parts, alternating with the milk. Start and end with the flour mixture. Mix on low speed and stop as soon as everything is combined. Overmixing will create dense cake layers.
Divide the batter evenly among the prepared pans. Tap each pan gently on the counter to remove air bubbles. - Bake and Cool the Cake Layers
Place the pans in the preheated oven and bake for 25 to 30 minutes, or until a toothpick inserted in the center comes out clean. Rotate the pans halfway through to ensure even baking.
Remove the cakes from the oven and allow them to cool in the pans for about 10 minutes. Then carefully transfer them to wire racks and let them cool completely. Cooling is crucial before applying the espresso soak and frosting. - Prepare the Espresso Soak
Brew 1 cup of strong coffee or espresso. If you want to add a grown-up twist, mix in the coffee liqueur. Let the mixture cool completely before using. The cake will absorb the liquid better when both are at room temperature.
Use a pastry brush or spoon to drizzle or pat the espresso mixture onto the surface of each cake layer, ensuring even coverage. Don’t drench—lightly moisten. You want to enhance the cake, not make it soggy. - Whip the Mascarpone Frosting
In a cold mixing bowl, whip the heavy cream until medium peaks form. Add the mascarpone cheese, powdered sugar, and vanilla extract. Beat on low speed to combine, then increase to medium until the frosting is thick, fluffy, and holds its shape. Be careful not to overmix—overbeating can cause the frosting to curdle.
If you’re unsure, stop beating as soon as the frosting becomes spreadable and holds soft peaks. You can test this by running a spoon through it; it should leave a clean trail. - Assemble the Cake with Layers of Flavor
Use a serrated knife or cake leveler to trim the tops of the cake layers if needed. Place the first cake layer on your serving plate or cake board. Brush it generously with espresso soak. Then spread a thick layer of the mascarpone frosting evenly on top.
Repeat with the second and third layers, making sure each one is aligned. Add the espresso soak, then frost. You should have enough frosting to coat the top and sides of the cake with a final smooth layer. - Apply the Final Frosting and Decoration
Once the layers are stacked, apply a thin crumb coat and refrigerate the cake for 20–30 minutes to help the frosting set.
Then, use the remaining frosting to cover the cake smoothly. Use a bench scraper or offset spatula to neaten the edges. Sift a generous layer of unsweetened cocoa powder on top. If you want to elevate the look, sprinkle chocolate shavings or curls over the cocoa.
Chill the cake for at least 1 hour before slicing. This helps the flavors meld and gives you cleaner slices.
Helpful Tips for Perfect Results
- Don’t overmix the batter, or your sponge layers will turn out tough.
- Use cold cream and mascarpone. This ensures your frosting stays firm and easy to spread.
- Brush, don’t pour the espresso soak. Even distribution without sogginess is the goal.
- Chill before slicing. The cake holds its shape better, giving you clean, bakery-style slices.
- Level your layers. A small dome can throw off the whole structure. Trim gently if needed.
Equipment You Will Need
Before you begin, make sure you have these tools ready to go:
- 3 round 8-inch cake pans
- Mixing bowls (various sizes)
- Hand or stand mixer
- Sifter or fine-mesh strainer
- Cooling racks
- Offset spatula
- Cake turntable (optional but helpful)
- Serrated knife or cake leveler
- Piping bag (optional)
- Pastry brush
Make-Ahead Tips for Less Stress
This tiramisu cake is perfect for making in stages:
- Bake the cake layers up to 2 days in advance. Wrap tightly in plastic wrap and keep at room temperature.
- Prepare the frosting a day ahead and store it in the fridge. Rewhip gently before using.
- Assemble the full cake up to 24 hours before serving. Store covered in the fridge. The flavor improves as it sits.
For larger events, freeze the cake layers weeks in advance and defrost the night before you plan to assemble.
How to Store Leftovers Properly
To keep your tiramisu cake tasting bakery-fresh:
- Refrigerate any leftover cake slices in an airtight container. Best consumed within 4 days.
- Freeze individual slices by wrapping them tightly in plastic wrap and then foil. Store in a freezer-safe container for up to 1 month. Defrost in the fridge overnight before serving.
Avoid leaving the cake at room temperature for extended periods, as the mascarpone frosting is sensitive to warmth.
Frequently Asked Questions
Q: Can I make this tiramisu cake without any alcohol?
Absolutely. Just skip the coffee liqueur. The espresso flavor is strong enough to carry the cake.
Q: What if I can’t find mascarpone cheese?
Cream cheese is a workable substitute but expect a tangier flavor. You can also mix cream cheese with whipped cream for a lighter touch.
Q: Can I use boxed cake mix?
You can, especially in a time crunch. Choose a plain white or vanilla mix and proceed with the espresso soak and mascarpone frosting as directed.
Q: Is it okay for kids?
Yes, if made without liqueur. The espresso soak adds flavor but minimal caffeine per serving.
Q: How do I make this gluten-free?
Substitute the flour with a 1:1 gluten-free baking blend. Check that your baking powder and other ingredients are also gluten-free.
Final Thoughts: Why You’ll Love This Tiramisu Cake
This tiramisu cake takes the best elements of the classic Italian dessert and makes them sliceable, shareable, and celebratory. It’s got all the creamy texture and rich flavor without being too sweet or complicated.
From the tender espresso-soaked sponge to the whipped mascarpone frosting, every bite is balanced and memorable. Whether for a birthday, anniversary, or casual gathering, this cake will win over everyone.
Keep this recipe in your back pocket—it’s one that feels special every time.


